Skip navigation

Tag Archives: guitar making

Earlier this week, I was contacted by Serhat Köse from Ankara, Turkey. He had spotted a steel string guitar, which he thought had been made by me,  for sale on the mobile classified app Letgo  and he wanted to know more about it.

Although the guitar carried my label, it certainly wasn’t an instrument that I had made and I’m puzzled how the label got into it. The label was designed for me several years ago by Gill Robinson, an artist who is also a classical guitar player, and I had enough printed to last the rest of my guitar-making life. I’ve got a stack of them in my workshop but the only way in which they leave is when they’re glued inside a guitar.

I wrote about my new labels on this blog back in 2012, so perhaps whoever put it into the guitar for sale in Turkey obtained it from that post. It didn’t occur to me then that I needed to watermark the labels to prevent fraudulent use.  But, of course, I have done so now.

Serhat sent me this photograph of the guitar. Anyone thinking of buying it should know that the label inside is a fake.

IMG-20180102-WA0008

Advertisement

It’s always a pleasure to hear what one’s instruments are doing and I recently caught up with this small steel-string guitar that I made nearly 5 years ago for Poppy Smallwood. Based on a Martin OO model with 12 frets to neck, it’s made of English walnut and has a sitka spruce soundboard.


(More photographs here, if you want to know about its construction.)


Poppy has been playing the guitar in all sorts of places, making a reputation for herself as a singer and songwriter. Here she is performing one of her own songs for BalconyTV against the background of St Petersburg.


You can hear several more of her songs on Soundcloud.


Stewart-MacDonald has been sending me emails recently about a device which allows guitar makers to adjust the height of a guitar nut or saddle while keeping the underside both square and straight (item # 4047 in the StewMac catalogue). Here’s a picture.

I thought that this was rather a good idea.  Although it’s not especially difficult to adjust a nut or a saddle by hand with a file, it’s a tedious job and often takes a while. And the reviews on the StewMac website were positive, saying how quick and accurate the device was.

The drawback is that it’s quite expensive.  By the time I’d paid  shipping and import duty, buying one would probably cost around  $200.   So, I decided to make one for myself.

The body is a length of aluminium bar, 15mm x 30mm, drilled at each end to take an axle that carries miniature ball bearings.

Used with a sheet of P280 sandpaper on a flat surface, it worked quickly and accurately.

As I hope you will be able to see from the photographs, it’s not difficult to make, although you will need access to a drill press and a small lathe. The materials needed (aluminium bar and four miniature ball bearings) are easily available and cheap.

Mine took a bit longer to construct than it should have done because I drilled the holes for the axles too low, which meant that the body of the device ended up too far above the sanding surface. So I had to bush the holes and re-drill. If you’re making one, I’d recommend positioning the axle to give a gap of no more than 2mm between the bottom of the device and the sanding surface.

It’s easy to understand why professional guitar players choose to play large powerful instruments. They need to be confident that they can fill a concert hall with sound.

But why do amateur players so often select instruments with the same characteristics? After all, they are mostly playing for their own pleasure, and mostly in their own homes. When they do play for others, the audience is usually small and loudness is rarely an issue.

I’ve often wondered whether they might do better to choose a smaller instrument with a shorter scale length. The loss of volume would be slight and probably more than compensated for by sweetness of tone. The shorter scale length would make fewer demands on the left hand and flatter their technique. For players with a smaller hand span, a shorter scale can extend their repertoire, bringing pieces with extreme stretches within reach. And, of course, small instruments have the advantages of being lighter to carry and taking up less room when put away.

I’ve written about smaller instruments before but, apart from a single request from a client who wanted an instrument with a scale length of 630mm instead of the usual 650mm, never got much in the way of a response. Recently however, my patience was rewarded and I was delighted to be asked to make a small guitar. There are a few photographs of it below.


DSC_9358-Edit

DSC_9382


It’s much smaller than modern concert guitars with a body length of 425mm and a width across the lower bout of 283mm.(Typical figures for a concert guitar would be 490mm and 380mm.) It’s based on an instrument made by Antonio de Torres in 1888 for which workshop drawings are available in Roy Courtnall’s book Making Master Guitars. The soundboard is spruce and I used some old Brazilian mahogany with a striking fiddleback figure for the back and ribs. It’s finished with French polish.


It was commissioned by Gill Robinson, a professional artist and keen amateur guitarist, who was looking for an instrument that was light and easy to handle. Here she is trying it out.


DSC_9398-Edit


Although I copied the shape and size and bracing pattern of the original guitar, I wasn’t trying to make a replica and I felt free to modify some details. The headstock is slotted to allow modern tuning machines, while Torres’ instrument used tapered wooden pegs. The scale length is slightly longer than the 604mm of the original at 613.5mm. This isn’t as arbitrary as it may seem, because 613.5mm gives the same open string length as a 650mm guitar with a capo at the first fret. I also used a 12 hole tie block for the bridge. Photographs of some of these details below:


DSC_9360


DSC_9390


DSC_9385


DSC_9365


DSC_9369


There’s an apocryphal story about someone sorting through the possessions of an elderly relative who had died. Among a houseful of stuff, he comes across a shoe-box labelled ‘Bits of string too short to keep’.

I sympathise with the elderly relative – at least as far as bits of wood are concerned. It’s hard to throw away even small scraps of timber, especially when they contain an attractive figure. One solution is to heat the workshop with a wood burning stove. Then the problem goes away each winter. Another possibility is to use them up making something tiny. A few years ago I wrote about making musical boxes. This week, wondering what to do with the walnut left over from the 5-string guitar that I wrote about in a previous post, I thought I’d make a soprano ukulele.

Apart from the walnut, I was able to use up other off-cuts that I hadn’t been able to bring myself to throw away: spruce for the soundboard, laburnum for the headstock veneer and the fingerboard, and a piece of plum for the bridge.

The plans for the ukulele came from Christophe Grellier, a French luthier, who generously makes them freely available on his website.

DSC_7281

DSC_7282

DSC_7285

DSC_7286

Stanley made two side rebate planes, numbered 98 and 99, which were mirror images of each other, designed to cut either the left or right vertical sides of a channel or dado. I found one in a secondhand tool a long time ago, and then spent years looking for its opposite number.

DSC_6971

While searching, I came across other designs of side rebate planes some of which ingeniously incorporated the ability to cut on left and right sides in a single tool. They’re attractive little devices and I struggled to resist buying them.

DSC_6972

DSC_6973

However, side rebate planes have two defects. The first is that the blades are hard to sharpen. It’s crucially important to maintain the exact angle of the cutting edge relative to the long axis of the blade because there’s no capacity for adjustment in the plane itself. Get it wrong and the blade cuts only the top or bottom.

The second defect is rather more serious: even sharpened and set up properly, they’re useless. I mean that literally: it’s not that these planes don’t work but that problems they could solve or jobs they could make easier never seem to crop up.

At least that’s what I thought until a couple of weeks ago when I found that a truss rod that I was installing into a guitar neck was a whisker too fat to enter the groove that I had routed. I could have got the router out again, but a side rebate plane provided a quicker and easier solution. A few passes and the truss rod was a nice snug fit.

DSC_6968

DSC_6969

Of course, I’ve been writing about my own experience. Other woodworkers may find side rebate planes so handy that they like keep a pair on the back of the bench. If so, I hope they’ll comment and describe the tasks they use them for.

Pattern makers often used long gouges and chisels with a crank between the blade and the handle. This allowed them to operate the tool deep into a workpiece without the handle catching on the edge. In his Dictionary of Tools, R. A. Salaman calls them trowel-shanked, but one often hears them referred to as cranked or crank-handled too.


trowel shank gouge


I’ve got a couple of long in-cannel gouges which I suspect were originally straight and later modified to achieve the same end. Perhaps R. Myers (the name stamped on the handle of the gouge) needed a tool with a cranked shank in a hurry, didn’t have time to obtain one, and so decided to make the best of what he had. The steel at the bent part of the shank is dark and discoloured, which supports the idea because it would surely have been necessary to heat the shank to bend it successfully.

DSC_6959

DSC_6960

Mr Myer’s talent for improvisation and economy prompted me to try something similar with a small chisel blade. I’d often thought that a small crank-handled chisel would be the perfect tool for cleaning up squeezed out glue when putting braces and harmonic bars on guitar soundboards but the only ones that I had come across were too big for what I had in mind, and too expensive as well.

I removed the handle from the chisel, wrapped the blade in a wet rag to prevent the important part of the tool losing its temper and then, after heating the shank to red heat with a propane torch, bent it up about 15°.

When it had cooled, I put the handle back on and was delighted to find that it worked just about as well as I hoped it would. The flat underside of the blade acts as a jig and prevents it digging in, and the raised handle allows it to be used in places where accessibility is restricted.

DSC_6966

DSC_6964

Although many people prefer guitars made of dark coloured wood, lighter colours can make good looking instruments too. The back and ribs of this one are in satinwood (Chloroxylon swietenia), a dense hardwood from Sri Lanka rarely available nowadays but which in Georgian times was widely used as a veneer in furniture making. It’s hard, brittle and difficult to work with hand tools but it bends fairly easily and, because it doesn’t contain large pores, finishes well with French polish. As its name suggests, satinwood is strongly reflective and when polished takes on a shimmering, almost iridescent, quality (sometimes called chatoyance) that’s impossible to capture in a photograph.

The rosette and bridge decoration are burr ash and the bindings are Rio rosewood. The soundboard is European spruce.

As usual, click on the thumbnails for a larger view.

I had intended my previous post to be the last on the V joint. But, as I’ve just completed a guitar using the one that I made for the photographs, the series can end in a rather more satisfactory way by showing how it turned out on an actual instrument.


Here’s a close-up to show any sceptics that the small extra piece of wood glued on to the male part of the V really is invisible in the finished joint – scroll down to the last couple of photographs in this post if you can’t remember what I’m talking about.


Before gluing up the joint, it’s worth taking some trouble to make sure that the two parts fit perfectly. I put the neck in a vise and hold the headstock in place while checking for gaps with a 0.05mm feeler gauge. A bright light behind the joint also helps to reveal places where the fit is defective.

Here I’ve discovered that the sides of the V are a bit loose…

…while the shoulders are tight.

A couple of fine shavings taken off the shoulders of the headstock using a shooting board…

…improves the fit. As a final check, I rub chalk over the male part of the V joint, locate the female part in position and press the joint together hard.

Where the fit is perfect, chalk will be transferred evenly. High spots, on the other hand, show up as a blotch of chalk surrounded by unchalked wood. Here it looks as if there’s a high point on one side near the mouth of the V.

A small file takes off the bump…

…and a second chalk fitting shows that the joint fits pretty well all over, except for a small low spot on one side at the apex of the V. I decide that I can live with that.

The next step is to dust off the chalk, size all mating surfaces of the joint with hot dilute hide glue and leave them to dry.

This is the clamping arrangement that I use. It’s important that the compression force runs through the centre line of the headstock and bears directly on the shoulders of the joint. Chiselling off the front of the V where it projects through the headstock allows the bar of the clamp to sit close to the surface of the headstock.

Once I’m happy that I can get the clamp into exactly the right position, I un-clamp, brush medium strength hide glue onto all joint surfaces, re-clamp it and leave it undisturbed for a couple of hours.

Here it is after taking the clamp off. The shadow below the right hand shoulder of the joint indicates that the headstock is slightly twisted relative to the neck. I suspected that this would happen while I was making the final adjustments but decided that the inaccuracy would be small enough to plane it out after the joint was glued up.

And I’m pleased to say that it was.

The back of the joint looks a bit weird until the extra block is shaved off.

But these two necks show that it comes out all right in the end. Even with a magnifying glass it’s scarcely possible to see that extra wood has been added and after the final shaping it will be quite invisible.

That’s the last of the series of posts on making a V joint. Thanks to anyone who has followed the story this far. Before finishing, I ought to add that there are many variations in the way this joint can be cut. Some makers, for example, prefer to use a template for marking out rather than a ruler and dividers. Please add a comment if you know how to do it quicker or better.

Click on the thumbnails below for larger pictures.

Moving on from my previous post about marking out a V joint, it’s time to cut and trim it to shape.

First, I saw out the V in the headstock, keeping close to the lines but being careful not to saw past them. I try to be brave in sawing up to the line at the narrow end of the V because that’s the hardest part to clean up later.

Next, I stop to put a fresh edge on the chisel that I’m going to use. When it will slice through tissue paper, I reckon that it’s sharp enough.

I clean up the V, paring from both sides towards the middle. Final cuts are carried out with the chisel resting in the knife line that marked out the joint. A small square is useful to check that the sides of the V are flat. The most difficult part of the joint is the apex of the V but a slicing cut with the corner of the chisel will remove the last bit of waste.

Here’s the female part of the V joint in the headstock finished. It shouldn’t be necessary to touch it again.

Now I cut the male part of the joint on the neck, starting with the angled shoulders. I chisel out a ramp for the saw in the usual way…

… and then saw down to the V, keeping clear of the lines.

I mark the starting point of the cuts for the sides of the V on the endgrain…

… place the neck in a vise, tilting it so that the cut will be vertical, and …

saw off the sides of the V with a tenon saw.

I mark and keep the pieces that I’ve just sawn off. They’ll be useful later.

Now I clean up the V and its shoulders with a chisel, paring in from both sides as I did for the headstock.

Here it is almost finished.

The neck and headstock are now tested for fit. Below is the view from the fingerboard side of the neck.

And here’s the view from the back of the neck.

As you can see, there’s a problem at the apex of the V, where a shadow shows that the neck isn’t quite deep enough to fill up the whole of the female part of the joint in the headstock. (My stock of mahogany for necks is planed up at a thickness of 25mm which means that I always run into this difficulty.)

The solution is to add a little extra depth at the apex of the V. This is where the offcuts that I saved come in handy. I prepare a small piece from one of these…

and glue it on, taking care that the direction of the grain in the extra piece is orientated in the same way as the grain of the neck.

When the glue is fully hard…

… it’s sawn roughly to shape…

… and trimmed with a chisel. This addition will be invisible in the completed joint.

The last step is to make sure that everything fits to perfection before glueing up. I’ll discuss how to do that in the next post.

Click on any of the thumbnails below for larger pictures.

Although the geometry of the V joint is simple, it’s surprisingly hard to to visualise if you’ve only seen the joint on a finished guitar. So, in an attempt to make the marking out easier to understand, I’ve sketched it below.

As with all joints, the more precisely it’s marked out the better the final result. It’s crucial that the stock is sized and squared up accurately. The headstock needs to be 17 or 18mm thick to give a final thickness of 19 or 20mm after application of the veneer. The neck must be rather thicker – at least 24 or 25mm – or there won’t be enough wood at the apex of the male part of the V where it engages with the female cut out part in the headstock. The side view in the drawings of the joint above will show what I’m getting at. (Even 25mm thickness may not be enough for full engagement but I’ll show how I deal with that problem in my next post.)

It’s also important that the end grain edge at the lower end of the headstock is exactly square to the sides and faces. I ensure this with a low angle plane and a shooting board.

To begin the marking out, I scribe a centre line down both faces of the headstock with a marking gauge, being careful to scribe both faces from the same edge.

Then I mark the corners of the V with dividers, placing points 18mm either side of the centre line to form the base of the V, and a single point 42mm up from the base on the centreline to define the apex. In the photograph, the pinpoints are marked with chalk to make them more visible.

A single bevel marking knife is used to mark the sides of the V, keeping the ruler on the outside of the V. I try not to cut beyond the point of the V, particularly on the back of the headstock. It doesn’t matter so much on the front which will be covered with veneer later.

To ensure that the ruler doesn’t slip, it’s helpful to fix a strip of fine sandpaper to its underside with double-sided tape.

Here’s the V marked out on one face of the headstock. This process needs to be repeated on the other face so that both sides of the headstock are marked. I haven’t bothered to illustrate this.

Now it’s time to mark out the male part of the joint on the neck. Again, I start by scribing a centre line down both faces. Then I square a line across the upper face of the neck slightly more than 38mm from the end.

Using a sliding bevel set for the angle that I want the headstock to make with the neck (10º in this case, so the bevel is set to 80º) I scribe both sides of the neck from the line that I’ve just squared across it.

Then I square across the back of the neck at the point where the angled lines on the sides end. Finally, I mark out the V on both faces using dividers set to exactly the same dimensions that I used on the headstock. The only difference is that, when it comes to scribing the lines with the knife, I keep the ruler on the inside of the V.

Here’s the top of the neck marked out…

…and here’s the back. You can see that, on the back, the V is positioned slightly further down the neck than it is on the front.

In the next post, I’ll show how I cut out the joint.

You can see larger versions of the photographs by clicking on the thumbnails below.

There are two ways to create the angle between the headstock and the upper end of the neck of a guitar. One is to saw it out whole from a large piece of wood; the other is to make it out of two pieces using a glued joint – either the V shaped joint invented by the early guitar makers or a scarf joint. Of these options, the most rational is the scarf joint. It’s quicker and easier to execute than a V joint and wastes less wood than sawing out a neck and headstock whole. What’s more, it has a large glued surface so it doesn’t rely on nanometric accuracy for its strength.

Despite the obvious advantages of a scarf joint, the V joint has become something of a fetish among guitar makers. This is easy to defend where historical accuracy is concerned. After all, if you’re attempting a copy of a 19th century guitar, it’s desirable – even obligatory – to imitate the constructional methods of the original maker. But for a modern instrument, why prefer a weaker joint that takes longer to make?

The answer, I guess, is to show that you can. It’s not a million miles away from the Georgian cabinet makers who made the pins of their dovetails so skinny that they almost vanished at the narrow end, as you can see in this photograph of the drawer of the table at which I’m sitting as I write this post.

There’s no practical advantage either in strength or speed of production in cutting dovetails like this. Indeed, the reverse must be true. But they do provide an understated way by which makers can demonstrate that they care about seldom seen details and show off their skill.

I’ve found myself using a V joint for both these reasons. Here’s a copy of a 19th century guitar that I’ve mentioned in previous posts. The V joint in this instrument was present in the original and it seemed right to keep it.

On the other hand, the V joint in the guitar below could perfectly well have been a scarf joint. The guitarist for whom I made the instrument didn’t notice it until I drew it to her attention. Still, I enjoyed making it and, for reasons that I can’t properly explain, felt that it was worth the extra time and trouble.

I’ve just cut a couple more V joints for guitars that I’ve got planned for 2012 and, although instructions for making this joint already exist (see here, for example), I thought it might be useful if I kept a camera handy to document the process. In the next post, I’ll explain how I mark out the joint.

This splendid photograph was taken by John Runk¹ in Stillwater, Minnesota on an 8 x 10 plate camera in 1912. I came across it in a book, The Photographer’s Eye written by John Szarkowski. Unless the chap in the hat is unusually short, these pine boards must be around 3 feet wide and 15 – 18 feet long. The saw marks run straight across the boards which made me wonder how they had been cut – not with a circular saw obviously. Were large bandsaws in operation at the beginning of the 20th century?

Buying wood a few months ago, I realised that I didn’t know much about modern methods of conversion of timber either. Here are a couple of photographs taken in Andy Fellows’ wood store in Gosport, Hants². He has supplied me with quite a lot of the wood that I’ve used in recent guitars including the Madagascan rosewood for this nylon string guitar and the beautiful walnut for this copy of a 19th century guitar by Panormo. These boards aren’t quite as large as those in Runk’s photograph but they’re still pretty big and I’ve only the vaguest idea of how he goes about transforming them into the book matched guitar sets from which he lets me pick and choose. Next time I visit, I shall try to find out a bit more.

Sometimes, when handing over an completed instrument to its new owner, I catch myself wondering whether they have any idea of the time and trouble that has gone into making it. (Of course, it’s enjoyable time and trouble so I’m not complaining. Even so … ) But I suspect that instrument makers and woodworkers aren’t any better. When we buy wood we’re more likely to whinge about the price than to acknowledge the efforts and skills of the people who selected the log and converted it into sets of conveniently workable dimensions like those below.

1. There’s a brief biography of John Runk here.

2. Andy Fellows also sells wood at his on-line shop, Prime Timbers.

Having established, to my own satisfaction at least, that it would be asking for trouble to make a steel string guitar without a truss rod, the next question was which type to use and whether to arrange to get access to it at the top of the neck or the heel.

My friend Peter Barton, who makes beautiful steel string guitars in Yorkshire, recommended the Hotrod, which is a 2 way adjustable truss rod available from Stewart-MacDonald and looks like this.

But there were a couple of reasons why I had misgivings about this device. One was that it weighs over 100g and I thought it might make a small or medium sized instrument too heavy in the neck. The other was that it’s 11 mm deep and, although it would be easy to rout a deep enough slot to accommodate it, there wouldn’t be room to glue a fillet over it. The top of the slot would have to be covered by the bottom of the fingerboard and I worried that, when the rod was tightened up it might split the fingerboard or cause a bump.

To check, I made a model guitar neck out of a scrap of softwood, routed out a slot, installed the hotrod, glued on a pine ‘fingerboard’ and tightened up the trussrod as hard as I could.

It worked fine. My anxieties were unfounded: no splits or bulges in the fingerboard, even though it was made of nothing more substantial than cheap pine, and I could put a curve in the neck in either direction.

Still, there’s no getting away from that fact that it’s heavy.

An alternative, which is less than half the weight of a hotrod, is a simple tension rod. This what’s recommended by Jonathan Kinkead in his book Build your own Acoustic Guitar (ISBN 0-634-05463-5), where he gives instructions how to make and install it. I liked this idea because of its simplicity and light weight, and because it’s easy to arrange to adjust it through the soundhole, which means that there’s no need to excavate the headstock to provide access to the nut.

If you go for this solution, you have to find a way to anchor the rod at the top of the neck. Kinkead recommends a metal dowel tapped to receive the threaded end of the rod. I made one out of silver steel and repeated the earlier experiment.

It’s easy to install, although it’s important to judge the depth of the hole for the dowel accurately to avoid drilling right through the neck.

And it seemed to work OK too, although obviously it’s only able to bend the neck in one direction. However, when I took the fingerboard off, this is what I saw.

The fixing at the top end of the neck had been pulled out of its cavity and had begun to travel down the neck. Of course, this experimental neck is made of softwood and the problem might be less severe in a real mahogany neck. Even so, I thought there had to be a better solution.

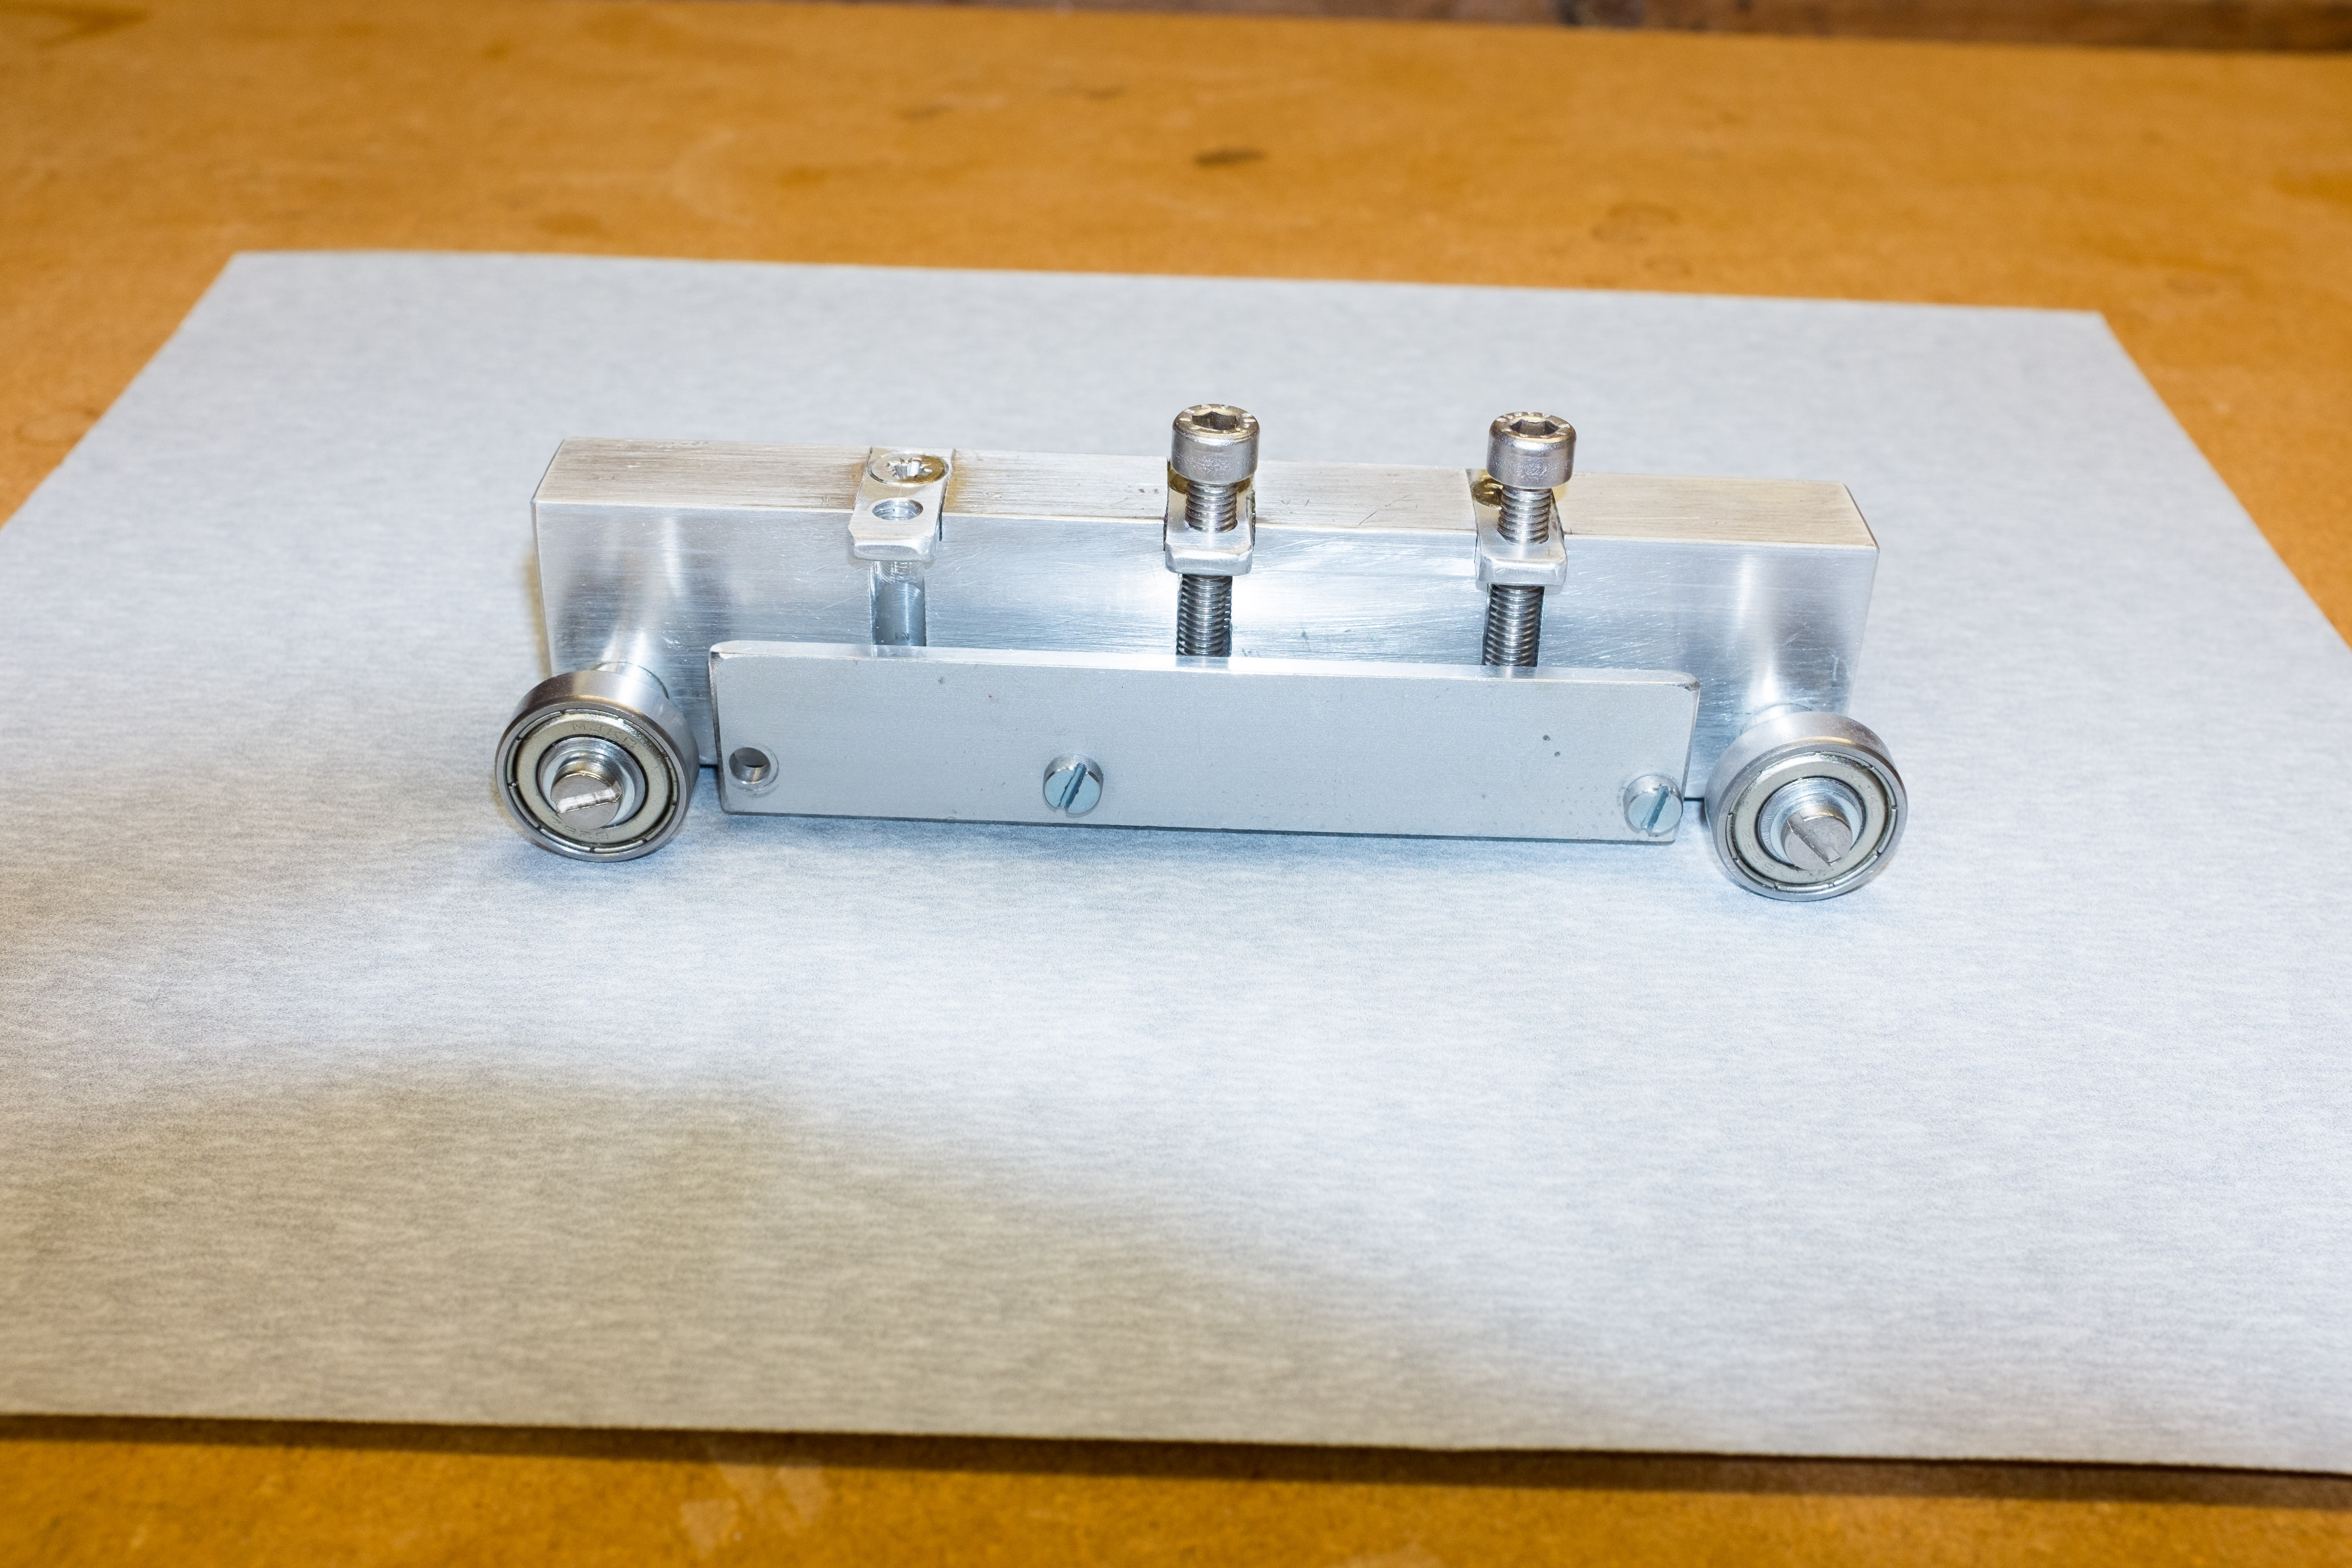
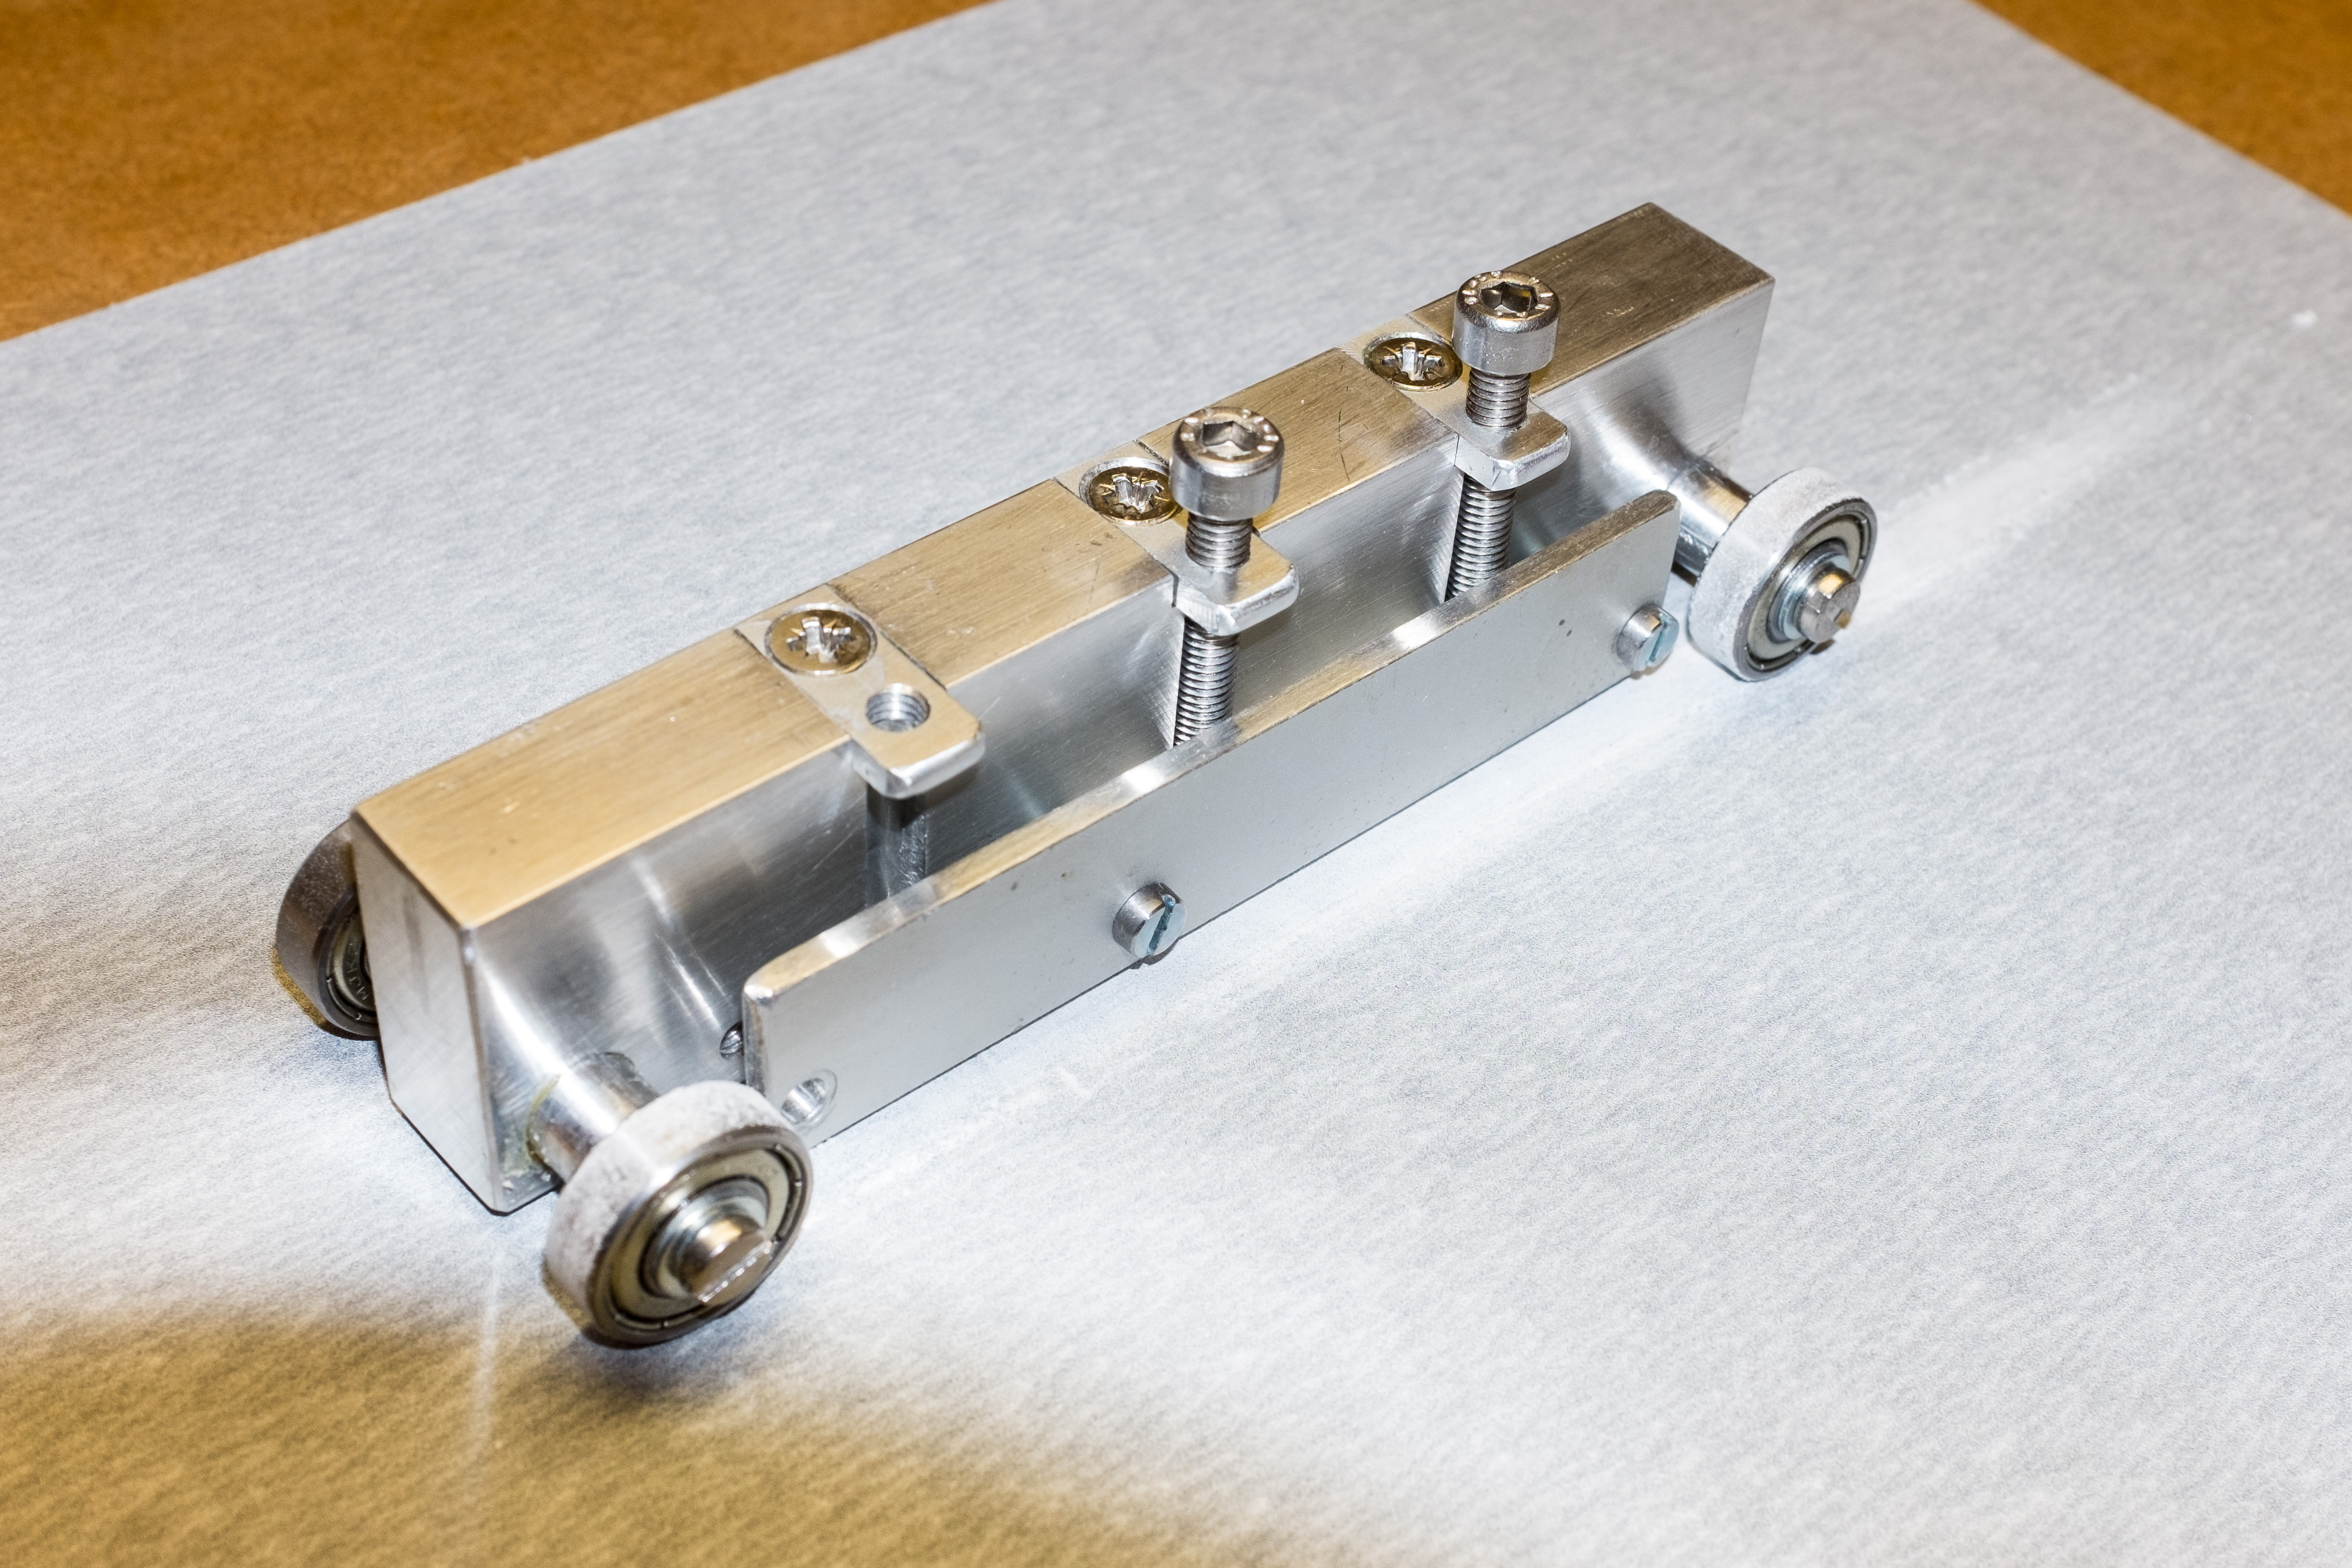
It was the shape that was wrong. The cylindrical nut had acted a bit like a wedge. When I made a rectangular shaped nut out of mild steel, it stayed put.

As you can see, the first nut was unnecessarily wide. A narrower version worked just as well.

That’s what I decided to use in this guitar: a tension rod made of 5mm studding, anchored at the top of the neck with a square nut and adjusted through the soundhole. The nut at the top of the neck was silver soldered to the studding to prevent it moving during any adjustments at the lower end. Tension in the rod is controlled by turning a 5mm column hex nut bearing on a substantial washer at its lower end.

This arrangement worked well in the finished instrument and was more than powerful enough to keep the neck straight against the pull of the strings. Next time I make a steel string guitar, I shall be tempted to use 4mm studding instead of 5mm, which would mean even less weight in the neck.

%d bloggers like this: