Skip navigation

Tag Archives: tools

Among the treasure trove of information and tips and tricks at Frank Ford’s website Frets.com there’s a description of how to turn a single-edge razor blade into a miniature cabinet scraper for repairs of guitar finishes. Click here to read it.
 

DSC_7599


I thought that this was a really clever idea and immediately ordered a box of blades to try it out. Ford says that he draws the edge of the blade across a round piece of hard steel such as a screwdriver shank to create a fine hook just as one might finish a full size cabinet scraper.

I’m not sure why, but I couldn’t make it work. Maybe it was my technique or perhaps the steel of the blade had hardened during the sharpening process but despite repeated trials all I could produce was a ragged edge that scraped less well than a blade straight from the box.


The solution was first to grind off the bevelled edge of the blade;


DSC_7600


then to make the blade edge straight and square on a diamond stone;


DSC_7603


and finally to turn a hook with a burnisher in the usual way.


DSC_7606


These little scrapers work extremely well if you need to remove polish or varnish and they’re easy to re-sharpen.


DSC_7598

Most woodworking vices are designed to hold pieces of wood with sides that are parallel. This is a problem for instrument makers because much of the wood they work with is curved or tapered.

So guitar makers frequently use a carvers’ vice, which has adjustable jaws, to get around the difficulty.  Dan Erlewine uses one in his excellent series of videos, Trade Secrets.  And here’s one in my own workshop.
 

DSC_7398


But they’re big, heavy, ugly things (mine is a particularly repellent shade of green) and whenever possible I prefer the simpler solution of a moving accessory vice jaw. This is no more than a block of wood with one gently curved side that allows it to rotate to accommodate the work piece. The flat side is lined with cork and there’s a thin sheet of plywood is glued to the top to maintain it in position while the vice is tightened.


DSC_7379

DSC_7380

DSC_7381

DSC_7382

DSC_7397


I’ve written about these before (see here) so I’ll only say that they’re easy to make and that they’re very effective in gripping gently tapering (10° or less) objects.


The device below  is a little more complicated in having 2 jaws connected at the bottom with a flexible hinge made of leather. It was originally intended to hold the head of a violin or cello  bow while the mortise for the hair was being cut – an invention of Andrew Bellis, who is a bow-maker in Bournemouth.

The 2 jaws are slightly thicker at one end (hence the arrow on the top) which gives it a head start when it comes to accommodating a tapered shape. The flexibility of the hinge allows it to adapt to objects with complex curves. It’s easy to make, too.


DSC_7391

DSC_7393


DSC_7394


Here’s a similar idea but in a more elaborate form. I took the jaws off a small Record vice and substituted cork-lined wood. On one side there’s a permanent version of the moving jaw described earlier. A thin metal bar located by a 3mm rod keeps it in position. I’m hoping the photographs will make things clear.


DSC_7383

DSC_7384

DSC_7403


A couple of photographs of it in action. In the first it’s holding the neck of the soprano ukulele that I mentioned in a previous post. The second shows it gripping the head of a violin bow while it is being re-haired.


DSC_7387

DSC_7390


I’m pleased with how these vice jaws turned out. And it’s certainly convenient having them immediately available to hold an awkwardly shaped work piece. However, I have to say that they’re significantly more effort to make than the simple devices described earlier. Unless you’re dealing with tapers and curves a lot, it may not be worth the time and trouble.

Stanley made two side rebate planes, numbered 98 and 99, which were mirror images of each other, designed to cut either the left or right vertical sides of a channel or dado. I found one in a secondhand tool a long time ago, and then spent years looking for its opposite number.

DSC_6971

While searching, I came across other designs of side rebate planes some of which ingeniously incorporated the ability to cut on left and right sides in a single tool. They’re attractive little devices and I struggled to resist buying them.

DSC_6972

DSC_6973

However, side rebate planes have two defects. The first is that the blades are hard to sharpen. It’s crucially important to maintain the exact angle of the cutting edge relative to the long axis of the blade because there’s no capacity for adjustment in the plane itself. Get it wrong and the blade cuts only the top or bottom.

The second defect is rather more serious: even sharpened and set up properly, they’re useless. I mean that literally: it’s not that these planes don’t work but that problems they could solve or jobs they could make easier never seem to crop up.

At least that’s what I thought until a couple of weeks ago when I found that a truss rod that I was installing into a guitar neck was a whisker too fat to enter the groove that I had routed. I could have got the router out again, but a side rebate plane provided a quicker and easier solution. A few passes and the truss rod was a nice snug fit.

DSC_6968

DSC_6969

Of course, I’ve been writing about my own experience. Other woodworkers may find side rebate planes so handy that they like keep a pair on the back of the bench. If so, I hope they’ll comment and describe the tasks they use them for.

Bruce Hoadley, in his excellent book Understanding Wood, writes that, when people who are thinking about taking up woodcarving ask him which tools to buy first, he tells them to get a set of good sharpening stones. It may not be what they expected to hear, but it’s sound advice. Most woodworking tools are worthless unless they’re properly sharp.

The trouble is that, once you’ve tumbled to this basic fact, sharpening can develop into something of an obsession. Over the years I built up a collection of stones, all acquired in the hope of obtaining a better edge. Many were natural stones, often bought for almost nothing at flea markets or second hand tool shops, but hard to identify. Although some of them were capable of producing a fine edge, most proved tediously slow to cut. As many other woodworkers have done, I discovered that synthetic waterstones and monocrystalline diamond whetstones did the job better and faster.

I didn’t know what to do with my unused oilstones until I heard about Sean Hellman, a professional woodworker based in Devon, UK who’ll make you just about anything in wood from a coracle to a garden bench. Sean has a longstanding interest in these natural stones, and I was pleased to let him have the three photographed below for his growing collection.

This one is probably a Charnley Forrest stone:

DSC_0368

And this may be a Dalmore blue:

DSC_0365

The label identifies this one as a Yellow Lake:

DSC_0371


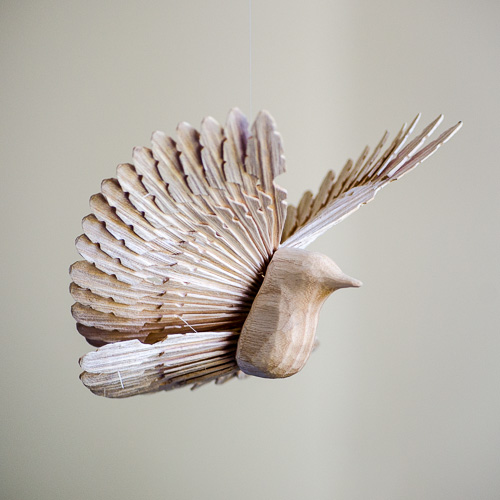
In exchange for the stones, Sean generously gave me one of the fan birds that he carves. It’s hard to believe, but these birds are made from a single piece of green wood.


DSC_4684

DSC_4687


This is how he does it:

http://seanhellman.com/woodwork/fan_birds.php


This tool, designed and made by Brian Hart, is a purfling marker. As violin makers will know, when moved around the edge of a violin plate, it marks closely spaced parallel lines a few millimetres inside the perimeter to guide the subsequent cutting and chiselling-out of the narrow channel into which the purfling is laid.

If necessary, the distance between the lines can be altered by placing shims between the marking blades and there’s a screw mechanism to change the offset of the blades and allow precise adjustment of the distance of the purfling channel from the edge of the plate. A feature of the design is that the handle and centre of gravity are below the marking blades. I find that this makes it easier to use than the usual design of purfling marker, which has the handle on top.

Here’s the corner of a cello where the purfling was marked out using this tool.

But of course it only works where there’s an edge. It’s no use if you want to imitate the Brescian makers and create an elaborate pattern of the sort seen on the violin below.

(I’m grateful to Andrew Sutherland, a violin maker and restorer in Lincoln, for providing this photograph and information about the violin. It was made in Dresden, Germany around 1870. Andrew reckons that the ornamentation was done by a purfling specialist in the workshop where the instrument was made after it had been completed and varnished. There are more photographs here.)


A possible solution occurred to me when I read Jeff Peachey’s description of how he sharpened the tips of a pair of jeweller’s forceps to make a tool to cut thin strips of tissue for book restoration. I wondered if the same idea could be adapted to make a freehand purfling marker.

Here I’ve re-shaped the tips of a pair of stainless steel forceps using a slip stone to create bevels on the inner faces, and drilled and tapped a hole for a small machine screw.

With the addition of a fold of brass shim stock between the blades, the width of the gap between the tips of the forceps can be adjusted precisely.

It works fairly well and can be used either freehand or to scribe around a template. I found it best to make one pass with the marker and then use a knife to deepen the cuts rather than trying to use the forceps to cut deeply. Here are some first experiments.

A little decoration goes a long way and not everyone believes that violins are improved by a double line of purfling and stylised floral motifs. On the whole, I think this ornamentation works better on cellos and viols than it does on smaller instruments. Still, there are times when a flourish is desirable – the fingerboards and tail pieces of baroque violins, for example – so my new purfling marker will probably be used occasionally.

A couple of years ago, I wrote about a simple device that made it easy to plane a taper on small pieces of wood – something that’s hard to do accurately if you try to hold the wood in a vice. (The piece is still available in the Tools and Jigs section of the website.) After I’d posted it, Jeff Peachey, who specialises in the conservation of books, sent me a photograph of a rather similar jig that he had made, which had the advantage of an adjustable endstop. I’ve been meaning to incorporate this modification ever since, but have only now got around to it. Below is a photograph of the original jig with a glued endstop of 1.5mm plywood.

To add a adjustable endstop, I inserted two short lengths of 6mm studding, drilling the pilot holes under size and then tapping the holes before screwing in the studding. Because the studs are inserted into endgrain, I was doubtful if they would hold so I glued them in too. And, to be doubly sure, I cross drilled the studs in situ and popped in a nail shank, the end of which is visible on the side of the jig.

Then I cut slots in a small piece of maple to make the endstop and fixed it in place over the studs with washers and nuts.

Here is the modified jig, ready for action.

A worthwhile improvement, I think. It will be possible to match the height of the endstop to the size of the end of the wedge and, should the endstop get damaged, it will be easy to true it up again.

In the meantime, Jeff Peachey has made a much bigger and better device, which is primarily intended for planing thin boards although it can cope with wedges too. There’s photograph of it on his website here.

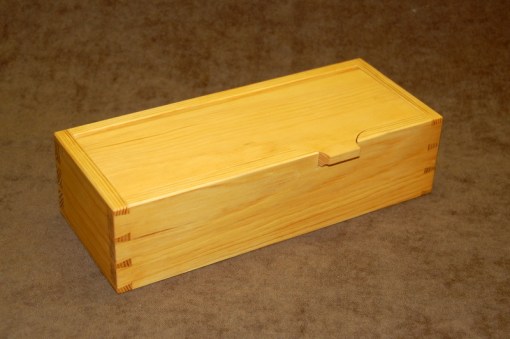
I’ve been making a few small wooden boxes to give as Christmas presents. They don’t really have much practical function, except as a place to keep pencils or stamps or other odds and ends, but they’re fun to make and people seem to like them. Part of the pleasure of constructing them comes from the small scale of the project. It’s a day’s work rather than a month for a guitar or a violin. And they allow you use up scraps of wood that were too nice to burn but that are too small to make much else out of. They also provide an opportunity to show off a bit, which brings me to the reason for writing this post.

Even people who know nothing about woodwork and cabinetry have heard about dovetails and recognise them as an emblem of craftsmanship in wood. So that’s the method of construction you should use if you want your skill to be noticed.

If you’re going to cut dovetails, it’s much easier if you’ve got a proper vice. Because of the position of the screw and slide bars in most bench vices, it’s only possible to grip the edge of the board that you’re dovetailing. A dovetailing vice, on the other hand, grips the whole work piece, preventing it vibrating and aiding accurate sawing. They are especially valuable for wide boards but they’re good for smaller pieces too. The idea came from Robert Wearing’s book, The Resourceful Woodworker, (ISBN 0 7134 8006 8). He uses threaded metal bars to provide the clamping force but I cannibalised the wooden handscrews from an old clamp that I picked up in a second hand tool shop. The vice is simply cramped to the top of the bench when needed.

I left the screws much longer than necessary for any dovetailing so that the vice would open wide enough to accommodate the body of a guitar when working on the tail stripe.

And, should you be wondering how the boxes turned out, here are a few photographs:


Last autumn, I met Konrad Sauer at an exhibition of woodworking and woodworking tools held at Westonbirt Arboretum in Gloucestershire. He’s a plane maker and let me try out the small smoother (shown in the photograph below) on a piece of American walnut. It wasn’t a highly figured piece of wood but the grain was far from obliging. The plane worked perfectly, taking a full width, tissue paper thin shaving and leaving a surface that required neither scraping nor sanding before applying a finish. Even more impressive however, was the plane’s performance when I turned the board of walnut around. The finish this time wasn’t quite as polished – how could it have been? – but the fact that here was a tool that could take a shaving against the grain without leaving areas of roughness and tear out was a revelation. For a guitar maker constantly needing to work highly figured tropical hardwoods to a perfect finish, it was almost too good to be true. Of course, I asked him to make me one and though I try to be patient, I check his website from time to time hoping to read about progress.

The website is full of interesting things but it’s especially worth reading the ‘Nuts and Bolts’ section for his discussion of why he makes his planes almost entirely with basic hand tools. Some of the reasons are obvious: such tools cost less and take up less space in the workshop. Others are more subtle: working by hand, although apparently slower than working with machines, means that an error can be caught before it turns into a costly mistake. Taking an extra shaving with a handplane is much more controlled than using a machine with a cutter head revolving at 3,000 rpm – not to mention safer and quieter. And working by hand allows him to adjust the plane that he is making by, say, making its handle a bit smaller or its blade angle a bit steeper, so that it’s exactly as his customer want it. These are just the same reasons why I build musical instruments by hand.

xsno4quarterview.jpg