Skip navigation

Category Archives: furniture

Several years ago,  a friend who lives in an old farmhouse in rural Oxfordshire asked me to make a table to go in her sitting room. We agreed that something in  English Oak in an Arts and Crafts  tradition –  simple lines, stopped chamfers , exposed joinery –  would fit with the character of the room. David Simmonds of Interesting Timbers found me some  figured tiger oak to make a book-matched top for it. There’s a photograph of the finished piece below, although unfortunately it doesn’t show the table in the room for which it was intended.

furniture 020


I mention it  because I’ve been thinking about the design of a couple of smaller tables to go in a different sort of room in a Victorian house in a city. This time,  I wanted something quite the opposite of the table above: light rather than heavy and elegant rather than sturdy. Looking for ideas,  I found this Shaker table in Christian Becksvoort’s book, The Shaker Legacy. Like many Shaker pieces, it’s attractive in its simplicity although, according to  Becksvoort, it isn’t very stable probably because it only has a narrow stretcher hidden behind the drawer.

Table 2


And I liked the unfussy lines of this mahogany dining table by Roger Heitzman, which appears  in  500 Tables (published by Lark Books), despite the fact that it’s several times larger, and much heavier-looking, than what I had in mind.


Table 1


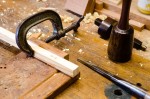
Taking elements from both these tables, I sketched out some ideas and made a rough prototype in soft wood, experimenting with the proportions and dimensions until I got close to the look that I was trying to achieve.


P1000822


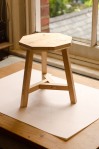
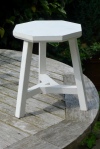
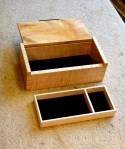
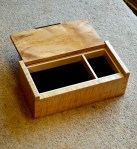
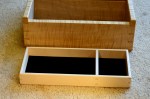
This version, in sycamore,  is on the way to being finished. It still lacks a proper top – I’m hoping to find some fiddleback sycamore to complete it. In the mean time I’m making do with a  sheet of  MDF painted white.


P1000832


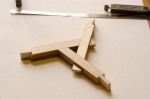
The curved stretcher is secured at each end by a tusk tenon and an ebony wedge, which turns the flimsy looking legs into a surprisingly rigid framework.


P1000827


To relieve the slightly monotonous look of sycamore, the stretcher carries a simple chip carved pattern between two beads worked with a scratch stock.


P1000830


I’m making another version in oak. When both tables are finished I’ll  post some more photographs.


Advertisement

DSC_8060


In the 1930s, the Head of the School of Furniture at the Birmingham College of Arts and Crafts, Mr A Gregory, wrote two books about woodworking: The Art of Woodworking and Furniture Making, and (shown above) Constructive Woodwork for Schools¹. I bought second-hand copies years ago when I first got interested in woodwork but  I hadn’t looked at them in a long time until I got a request for a chair suitable for a young child.


Constructive Woodwork for Schools  contained a simple design for exactly what was needed.


DSC_8057

DSC_8058


I was amused (and, as things progressed, slightly irritated) by Gregory’s remark  ‘It it is not a very difficult piece of work’.  He’s right, I suppose,  in that it’s largely mortise and tenon joinery. But there are 24 of these joints to be cut and adjusted and, because the front of the chair is wider than the back, they’re not all at right angles. The business of fitting the arms and making the doubly curved top rail isn’t completely straightforward either.  I certainly didn’t find making this chair a breeze, and I should have thought it would have been a fairly taxing task for a schoolboy. Or perhaps I’m underestimating the standard of woodworking 80 years ago?

Here are the individual components and the chair assembled dry. The wood is English oak.


DSC_7995


DSC_7989


And here it is glued up and  finished with a couple of coats of Danish oil. The seat is woven out of seagrass.


DSC_8050


Happily, the client seems satisfied.


DSC_8068


¹ I assumed that these two books would have been long out of print but, in fact, new copies are still available and there are lots of reasonably priced second-hand copies on Abe Books  too.  The books may be a little dated in their approach but I thought that they were well worth reading. I recommend them, particularly The Art of Woodworking and Furniture Making, to anyone wanting to develop their skills in designing and making wooden furniture,  especially if they’re attracted to work in the tradition of  Edward Barnsley and the Arts and Crafts movement.

Since writing about Bang, Ai Weiwei’s enormous installation at the 2013 Venice Biennale constructed entirely out of traditional three-legged stools, I discovered that he had produced several smaller sculptures using the same piece of furniture as the basic repeating unit.


Grapes2

Grapes 1

Grapes3


I’m not sure why Ai Weiwei is so fascinated by these stools but one can’t help admiring the skill of the designers and woodworkers who brought these sculptures into existence.


I’ve no ambition to make these stools into sculpture, but after completing a single scaled down stool (see earlier post)I thought I’d make a larger version to use in the workshop. Here it is. The seat height is 22 inches and the legs are splayed at 8º from the vertical, which makes the proportions taller and narrower than the original. The legs and stretchers are Douglas fir and the top is English Cherry. It’s finished with a couple of coats of Danish oil.


DSC_7609

DSC_7612

I hadn’t realised, when I wrote about Ai Weiwei’s Bang in my last post, that traditional three-legged Chinese stools had featured in Popular Woodworking a few years ago. Thanks to Mike for commenting and alerting me to the articles.

At the end of the piece on Ai Weiwei, I’d said how much I liked the design of three-way stretcher and added that I might make such a stool for the workshop. So it was extremely useful to have a warning that these stools aren’t as easy as they look.

I started by making a full size drawing for a stool with a final height of around 10 inches (top of seat above floor) and a 10º splay to the legs. This is around half the height of those in Ai Weiwei’s installation but I reckoned it would be big enough for any constructional difficulties to become apparent.

First I made the three way stretcher, leaving each of the pieces over length. This is straightforward mortise and tenon joinery, complicated only by the fact that angle at which the stretchers meet is 60º.

DSC_7538
DSC_7539

Then I marked out and cut the tenons at the peripheral ends of the stretchers. The popular woodworking articles say that these tenons need to be angled so that they point at the imaginary centre of the equilateral triangle that the stretchers make. I have to say that, although I followed this suggestion, I’m not completely convinced that it’s necessary. Would a Chinese carpenter making a utilitarian bit of furniture have gone to the trouble to do that?

Obviouusly, the marking out also needs to allow for the fact that the legs are splayed and don’t meet the stretchers at right angles.

DSC_7541

Next I marked and chopped out the mortises in the legs, and fitted legs and stretchers together. It was only at this point that I noticed that each of the three legs and each of the three stretchers were identical to one another. Had I tumbled to this fact earlier, marking out would have been easier.

DSC_7545

I’ve only got a baby-sized lathe, so I couldn’t make a round seat. Foolishly, I made it octagonal instead. It’s not a disaster but hexagonal would surely have been a better shape for something with 3 legs.

Here’s the stool assembled dry.

DSC_7543

And here, after gluing and cleaning up.

DSC_7555

I painted it with a warm grey undercoat, top coated with a flat white eggshell and finally cut it back with fine wet and dry paper to give it a slightly distressed look.

P1030162

The stool is strong, stable and light but, at this size, not much use for anyone but a young child. However, I’ve learnt how to build one and I shall make the next twice the height.


Click on thumbnails below for larger versions of the photographs.

A couple of years ago I saw Ai Weiwei’s installation “Bang” at the Venice biennale and I’ve been meaning to post some photographs of it ever since. It was shown in the French pavillion at the Giardini della Biennale.

 
P1010550
 

Nearly 900 traditional Chinese three-legged wooden stools had been ingeniously joined together to make a huge three dimensional lattice work of wood.
 

P1010544
 

A closer look to give a sense of how it was put together.
 

P1010542

P1010541
 

And here’s a more detailed view of the joinery of these stools.
 

P1010535

P1010547

P1010536
 

What is it about and what does it mean? Well, the most compelling interpretation I’ve heard came from a friend who said that it looked as if these traditional domestic objects had been picked up by a great wind. She saw the installation as a visual parallel of the way economic development in rural China was sweeping aside old ways of life.

If you think that’s too straightforward, here are some comments from the art critics:

‘The single stool as part of an encompassing sculptural structure may be read as a metaphor for the individual and its relation to an overarching and excessive system in a postmodern world developing at lightning speed’.

‘Weiwei’s “Bang” criticizes modern throw-away culture, which has replaced artisans and craftsman with industry and factories. Hand carved wood has been replaced by disposable plastic and aluminum. Weiwei arranged the handmade stools in chaotic bursts and arcs as a metaphor for the industrial world that has spiraled out of control as industry and technology develop at incredible rates.’

‘Ai Weiwei’s work ‘bang’ employs 886-three legged wooden stools made by traditional craftsmen whose expertise is now something that is rare to find, and has installed an expansive rhizomatic structure which speaks of the increasing volumes of organisms in our world’s megacities. The single stool can be interpreted as a metaphor for the individual, and its relation to an overarching and excessive system in a postmodern world which is developing faster than it can keep up with.’


Still, whatever you think of the installation as art, the stools themselves are rather attractive. I especially like the three way stretcher, which can’t be that easy to construct. Perhaps I’ll try making one for the workshop.

A couple of years ago, Mark Bennett, who is a furniture maker in Malton, Yorkshire, with a genius for discovering beautiful and unusual wood, gave me this remarkable piece of willow. I knew that willow sometimes exhibits an attractive figure because I’d seen it in the backs of baroque cellos, which are sometimes made in that wood, but I’d never encountered anything quite as striking as this.


I wondered for a long time about how best to use it, toying with the idea that it might work as a guitar headstock. But willow is light and soft and I doubted that it would be strong enough. In the end, it seemed safer, if less imaginative, to use it to make a box.


It’s a simple rectangular design (10½ x 5¼ x 3½ inches) with a single tray in sycamore. The lid is a piece of wildly figured ash, hinged on brass pintles. It’s finished in clear French polish.


Larger photographs available by clicking on the thumbnails.

The chap in the photograph below, sporting a magnificent walrus moustache, was my great-great-grandfather. I don’t know exactly when he was born or when he died, but I do know that he worked as a cabinet maker in London and later in Plymouth during the second half of the 19th century.


Several pieces that he made are still in the family and among them is this decorative wall bracket. I’m not sure what it was meant for – probably a small clock or an ornament.


Quite apart from the pleasure of owning something made by a woodworking ancestor four generations earlier, I’ve always liked the bracket for its nicely judged proportions.


And I admire his neat solution to the problem of bringing everything to a point at the bottom of the bracket.


Needing a table for a narrow hallway a few years ago, I borrowed his design for a larger version in walnut.


Click on the thumbnails below if you’d like to see larger pictures.

The low Autumn sunshine streaming into my workshop last week showed this oval walnut bowl in such a flattering light that I couldn’t resist taking a photograph. The bowl was being carved on the bench because my lathe isn’t big enough to turn a piece of this size.

Mind you, carving lets you do things that wouldn’t be possible on a lathe, as the photograph below shows. It’s taken from David Pye’s book The Nature and Art of Workmanship (ISBN 1-871569-76-1) and the author carved the dish out of the wood of the wild service tree, Sorbus torminalis. Service wood is not a timber that I’ve ever seen, although I understand that it was once sought after for harpsichord jacks.

I wasn’t attempting anything nearly as ambitious as Pye’s dish. What I had in mind was the egg-like form that Barbara Hepworth frequently used in her sculptures – but on a much smaller scale and as a utilitarian object rather than a work of art.

Here’s a photograph of the completed bowl, which has been finished with clear French polish.

To see a larger version of these photographs as a slideshow, click on any of the thumbnails below.

Footnote

1. Thanks to due to the anonymous photographer who posted the picture of Barbara Hepworth’s garden in St Ives, Cornwall on Flickr (http://flic.kr/p/7J4gud).

A trip this summer took me to Stein am Rhein in northern Switzerland, where I visited the museum of the abbey of St Georgen – a place both fascinating and frustrating. Fascinating because of the interest of the buildings and their contents. Frustrating because there was so little explanation: no convincing narrative about how or why the place, which ceased to be a religious foundation 500 years ago, still exists.

Even so, it contained several things to interest woodworkers. Here are three: the first was this enormous wine press which, if the carving on the main beam is to be believed, was built in 1711. Maybe it’s an attraction of opposites but, as an instrument maker who has to fuss about tenths of a millimetre, I couldn’t help thinking what fun it would be to chop out mortices and tenons on this sort of scale.

The second was this fine chest decorated with paint and chip carving. It too, had a date carved in it – 1697, just visible bottom right – which seems plausible enough. But what on earth was it doing in an abbey that had stopped functioning as an institution during the reformation in the early 1500s?

The last was this remarkable repair to the bottom of a pine cupboard. Rot and wood worm must have got into it, but someone thought that that it was worth saving and, perhaps inspired by the Alps which aren’t too far away, scarfed in a new footing. I’d never seen anything like it. Please write if you know of other examples or can explain more about the technique.

This is the back way in to the Ca’ del Duca, a palace off the grand canal of Venice, begun in 1467 but never fully completed. The stylish way to get there is by water taxi but it’s quite as nice and a lot cheaper to walk, which is what I did to see Luxembourg’s exhibition at this year’s Venice Biennale – Le Cercle Fermé by Martine Feipel and Jean Bechameil.

Like most of what was being shown in the Biennale, it turned out to be an installation rather than a conventional exhibition but I have to admit that it provided a mildly amusing experience. You walked along corridors with undulating walls, got disorientated by halls of mirrors and nearly lost your balance navigating wonky floors. It was supposed to challenge our notions of stable constructed space and to make us look differently at the world when we leave. There are more photographs (and some pretentious artspeak) here.

Two of the rooms were especially interesting to furniture makers. Chairs and chests of drawers had been made to look as if wood had a melting point and they’d been left too close to the fire. They were still recognisably chairs or drawers, although obviously you couldn’t use them for sitting on or keeping things in. Indeed, part of the point was that they’d be completely useless for any practical purpose.

I shall leave you to decide whether this is a clever way of encouraging us to think in a fresh way about familiar objects or whether Feipel and Bechameil are just playing a prank.

There was however, a wonderful floor in one of the rooms. Not a wonky one to throw you off balance but a laid wooden floor that had been part of the Ca’ Del Duca in its days of glory. It hadn’t been looked after very well and my photograph isn’t very good but I couldn’t help thinking that it was rather more interesting (and enduring) than the chairs.

This splendid photograph was taken by John Runk¹ in Stillwater, Minnesota on an 8 x 10 plate camera in 1912. I came across it in a book, The Photographer’s Eye written by John Szarkowski. Unless the chap in the hat is unusually short, these pine boards must be around 3 feet wide and 15 – 18 feet long. The saw marks run straight across the boards which made me wonder how they had been cut – not with a circular saw obviously. Were large bandsaws in operation at the beginning of the 20th century?

Buying wood a few months ago, I realised that I didn’t know much about modern methods of conversion of timber either. Here are a couple of photographs taken in Andy Fellows’ wood store in Gosport, Hants². He has supplied me with quite a lot of the wood that I’ve used in recent guitars including the Madagascan rosewood for this nylon string guitar and the beautiful walnut for this copy of a 19th century guitar by Panormo. These boards aren’t quite as large as those in Runk’s photograph but they’re still pretty big and I’ve only the vaguest idea of how he goes about transforming them into the book matched guitar sets from which he lets me pick and choose. Next time I visit, I shall try to find out a bit more.

Sometimes, when handing over an completed instrument to its new owner, I catch myself wondering whether they have any idea of the time and trouble that has gone into making it. (Of course, it’s enjoyable time and trouble so I’m not complaining. Even so … ) But I suspect that instrument makers and woodworkers aren’t any better. When we buy wood we’re more likely to whinge about the price than to acknowledge the efforts and skills of the people who selected the log and converted it into sets of conveniently workable dimensions like those below.

1. There’s a brief biography of John Runk here.

2. Andy Fellows also sells wood at his on-line shop, Prime Timbers.

This tool, designed and made by Brian Hart, is a purfling marker. As violin makers will know, when moved around the edge of a violin plate, it marks closely spaced parallel lines a few millimetres inside the perimeter to guide the subsequent cutting and chiselling-out of the narrow channel into which the purfling is laid.

If necessary, the distance between the lines can be altered by placing shims between the marking blades and there’s a screw mechanism to change the offset of the blades and allow precise adjustment of the distance of the purfling channel from the edge of the plate. A feature of the design is that the handle and centre of gravity are below the marking blades. I find that this makes it easier to use than the usual design of purfling marker, which has the handle on top.

Here’s the corner of a cello where the purfling was marked out using this tool.

But of course it only works where there’s an edge. It’s no use if you want to imitate the Brescian makers and create an elaborate pattern of the sort seen on the violin below.

(I’m grateful to Andrew Sutherland, a violin maker and restorer in Lincoln, for providing this photograph and information about the violin. It was made in Dresden, Germany around 1870. Andrew reckons that the ornamentation was done by a purfling specialist in the workshop where the instrument was made after it had been completed and varnished. There are more photographs here.)


A possible solution occurred to me when I read Jeff Peachey’s description of how he sharpened the tips of a pair of jeweller’s forceps to make a tool to cut thin strips of tissue for book restoration. I wondered if the same idea could be adapted to make a freehand purfling marker.

Here I’ve re-shaped the tips of a pair of stainless steel forceps using a slip stone to create bevels on the inner faces, and drilled and tapped a hole for a small machine screw.

With the addition of a fold of brass shim stock between the blades, the width of the gap between the tips of the forceps can be adjusted precisely.

It works fairly well and can be used either freehand or to scribe around a template. I found it best to make one pass with the marker and then use a knife to deepen the cuts rather than trying to use the forceps to cut deeply. Here are some first experiments.

A little decoration goes a long way and not everyone believes that violins are improved by a double line of purfling and stylised floral motifs. On the whole, I think this ornamentation works better on cellos and viols than it does on smaller instruments. Still, there are times when a flourish is desirable – the fingerboards and tail pieces of baroque violins, for example – so my new purfling marker will probably be used occasionally.

Recent posts have been about experiments or jigs or tools so, to make a change, here’s a folding book (or music) stand in pippy English oak.

I’ve made quite a few of these in various woods and various sizes. After the curves of violins and guitars, it’s a pleasure to make something based on a right angle. They make good presents for musicians and bibliophiles. And people who like to cook find them useful for holding recipe books open.


The arms that hold the pages open are in bog oak…


… and so are the dowels which act as hinges for the frame that props the stand open.


Here are a couple more. The one on the left is is sycamore, with page holding arms and dowels of laburnum.


The construction is fairly straightforward. The only tricky bits are in making a neat job where the arms that keep the book open fit into the bottom ledge and in constructing the curved stretcher of the frame that allows the stand to fold up when not in use. I’d be happy to give more details if anyone is interested.

%d bloggers like this: