Skip navigation

Category Archives: Uncategorized

Fitting a door into a carcass that isn’t perfectly square is a common task for cabinet makers, but it’s rare that the problem is as severe as this or on such a large scale. So I take my hat off to the Venetian joiners who installed these doors in a palazzo near the Church of Sant’ Alvise in the Cannaregio sestiere of Venice.

P1010409-Edit

Advertisement

My son, who is an engineer working on the design of big diesel engines, tells me that it’s all too easy, especially with CAD software, to draw what seems a brilliant plan – only to meet derision when someone realises that it can’t be manufactured. You can imagine the sort of thing he means: a nut where there isn’t enough space to get a spanner in to tighten it; or the need for a long bolt in a place with insufficient clearance to get it into the hole.

As someone who works with wood, I enjoy teasing him with the complete opposite: something that self-evidently has been manufactured but that looks impossible. One example is the captive screw here. But that’s a bit of a cheat because it depends on exploiting the remarkable elastic properties of some woods when treated with heat and moisture. Better are the apparently impossible double and triple dovetails that I wrote about a year or so ago.

Here’s something in the same vein that can be sculpted out of wood with nothing more than a sharp chisel. Or, should you have one handy, a 5-axis CNC milling machine will do the job almost as well – see here.

For larger images, click on the thumbnails.

The low Autumn sunshine streaming into my workshop last week showed this oval walnut bowl in such a flattering light that I couldn’t resist taking a photograph. The bowl was being carved on the bench because my lathe isn’t big enough to turn a piece of this size.

Mind you, carving lets you do things that wouldn’t be possible on a lathe, as the photograph below shows. It’s taken from David Pye’s book The Nature and Art of Workmanship (ISBN 1-871569-76-1) and the author carved the dish out of the wood of the wild service tree, Sorbus torminalis. Service wood is not a timber that I’ve ever seen, although I understand that it was once sought after for harpsichord jacks.

I wasn’t attempting anything nearly as ambitious as Pye’s dish. What I had in mind was the egg-like form that Barbara Hepworth frequently used in her sculptures – but on a much smaller scale and as a utilitarian object rather than a work of art.

Here’s a photograph of the completed bowl, which has been finished with clear French polish.

To see a larger version of these photographs as a slideshow, click on any of the thumbnails below.

Footnote

1. Thanks to due to the anonymous photographer who posted the picture of Barbara Hepworth’s garden in St Ives, Cornwall on Flickr (http://flic.kr/p/7J4gud).

Recent posts have been about experiments or jigs or tools so, to make a change, here’s a folding book (or music) stand in pippy English oak.

I’ve made quite a few of these in various woods and various sizes. After the curves of violins and guitars, it’s a pleasure to make something based on a right angle. They make good presents for musicians and bibliophiles. And people who like to cook find them useful for holding recipe books open.


The arms that hold the pages open are in bog oak…


… and so are the dowels which act as hinges for the frame that props the stand open.


Here are a couple more. The one on the left is is sycamore, with page holding arms and dowels of laburnum.


The construction is fairly straightforward. The only tricky bits are in making a neat job where the arms that keep the book open fit into the bottom ledge and in constructing the curved stretcher of the frame that allows the stand to fold up when not in use. I’d be happy to give more details if anyone is interested.

At the beginning of March I posted a few photographs of dovetail joints that, at first sight, look impossible to put together, let alone take apart. As I said then, there’s no real trick to them; it’s just that the assumptions one makes about the parts of the joint hidden to the eye turn out to be wrong.

Here’s the double dovetail disassembled:


And here is the triple dovetail:


Ingenious and amusing, but rather short on practical applications.

While on the subject of the apparently impossible, here’s another teasing puzzle that woodworkers can make to annoy their friends. It consists of 3 pieces: a cylinder, a symmetrical double cone and an inclined plane.

Surprisingly, placed together like this, there is no movement in either cylinder or cone. Wouldn’t you expect them to roll down the inclined plane?

The cylinder does, of course, roll down the plane but to take the photograph, I’ve used a ruler as a chock to prevent this happening.

The cone, on the other hand, has an inexplicable tendency to roll up hill. Once again, I’ve used a ruler as a chock to prevent it doing so.

These still photographs don’t really convey the anti-gravity properties of the double cone. For a more convincing demonstration, have a look at this video on YouTube.

Or, in case the link doesn’t work, paste this url into your browser: http://www.youtube.com/finelystrung#p/a/u/0/g7dCCskRMUg

As you can see, I’m working on a cello at the moment. But I’ve written about cello making before and, rather than repeat myself, I thought that I’d show a few wooden constructions that have amused me recently.

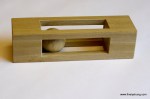
First, an old favourite – but one that people who don’t know the secret find seriously puzzling – the captive screw. There a trick to its manufacture, of course, and, if you can’t work out how it’s done, this YouTube video explains.

Rather more sophisticated is this apparently impossible double dovetail. There’s no trick here and the joint comes apart with ease. It’s just that the geometry of the joinery isn’t what one assumes it to be at first sight. The joint is occasionally useful. Roy Underhill describes an application in his book, The Woodwright’s Guide (ISBN978-0-8078-5914-8), where it’s employed to join the front legs to the top of a work bench.

The triple dovetail below is an ingenious puzzle that I found in Edwin Wyatt’s book, Wonders in Wood (ISBN 0-941936-40-6). Wyatt says that it was invented by someone called A B Cutler and published in a magazine, Industrial Arts and Vocational Education in 1930. It has no practical application as far as I know. The geometry of the joint is a variation on that of the double dovetail but it’s rather harder to make. Again, despite all appearances, the two pieces come apart easily – as you can see if you compare the positions of the ebony dots in the two photographs.

In a future post, I’ll show some photographs of the joints pulled apart.

A while ago, a friend bought himself a lap steel guitar – the sort with a hollow neck, square in section – but became frustrated because he couldn’t find a capo that would fit it. He couldn’t use the usual type of capo, of course, because the hollow neck of the guitar was too thick and too fragile to allow the clamp to work and because the strings were too high over the fingerboard. So I made him this device, which is easy to fit and adjust and works well.

DSC_0007

In case anyone else has a similar problem, I thought it might be worth explaining how it’s made. You’ll need a scrap of hardwood roughly 2.5 x 1 x 3/8 inches in size; a piece of bone or ebony to make the inverted nut; some cork or leather to damp the strings on the headstock side of the capo; a 2.5 inch length of round bar in brass or steel of 1/4 inch diameter; a short length of threaded rod of 1/8 inch diameter; and a small piece of wood or metal or plastic to make a knob with which to turn the threaded rod. You’ll also require a matching tap to cut a thread in the hole of the brass bar.

The photographs below should make the construction clear, so I’m not going to give details. If you have any queries, please email me at info@finelystrung.com. The only thing to watch out for is that the threaded rod that pulls the bar against the underside of the strings shouldn’t be too long or it may damage the fingerboard.

To fit the capo, loosen the screw holding the metal bar – but not so far that the bar becomes detached. Hold the capo with its long axis parallel to the strings and insert the bar between the two middle strings. Then rotate both the capo and the bar through 90 degrees, making sure that the nut side of the capo is orientated to face the bridge. Slide the capo to the desired position and screw it up just tightly enough to produce a clear sound from all the strings.

DSC_0001-1

DSC_0004-1

DSC_0003-1

DSC_0005

DSC_0013

Now that the repair that I wrote about in my last post is complete, it’s time to get back to the guitar that I’m currently making. I’ve routed the ledges for the binding and purfling to sit in – a job that I never approach without trepidation since it’s so easy to ruin weeks of work by a moment’s inattention when you’re using a tool whose cutter revolves 25,000 times a minute. Fortunately, there were no mishaps. I never much like using an electric router – nasty, noisy, top-heavy things. But the next task of preparing and bending the binding strips will be easier to enjoy.

Well, this was the moment that I was trying to describe. First, the neck was glued to the soundboard. Then the tail block was positioned and glued, the ribs slid into place, and glued at the neck and the tail. Finally, the perimeter of the soundboard was attached with tentellones. Only a day’s work, but enough energy was added to the system (to continue my ridiculous metaphor from physics) to achieve a quantum leap.

Even if a guitar maker works away at a fairly steady rate, there are times when progress will be slow and times when the instrument makes a quantum leap. Cutting the soundhole in the top after inlaying the rosette always seems to me to be a quantum leap moment. Another, as I’ve mentioned before, is when you start to assemble the collection of oddly shaped pieces of wood into something that is recognizably a guitar. I’m looking forward to that moment later today. For now, it’s still a pile of oddly shaped pieces of wood:

Here’s the soundboard with all the bracing glued into place. As you can see, I’ve used a conventional arrangement with 7 struts symmetrically arranged in the familiar fan system and 2 closing bars at their lower ends. Over the years, guitar makers have experimented with the geometry of the bracing pattern with asymmetries, wide squat bars, tall narrow bars, transverse bars under the bridge, openings in the transverse bar under the soundhole and endless other variations. Part of the reason, I suspect, is that it’s so easy to do. No new jigs or moulds to make; no new skills to learn. And it’s something to talk to clients about – a unique selling point. Maybe that is too cynical but I tend to agree with William Cumpiano and Jonathan Natelson who wrote in their classic Guitarmaking: Tradition and Technology that ‘…specific elements of brace design, in and of themselves, are not all that important’. I need to admit that I have used a lattice bracing system with cedar soundboards (as I did with the last guitar that I made, which is being finished at the moment). It works perfectly well but I’m not yet convinced that it’s a significant improvement. Anyway, whatever the pro’s and con’s of these different systems, the new guitar is entirely traditional in its bracing.

The great photographer, Henri Cartier-Bresson, is said never to have re-arranged a scene or cropped a negative. It was, I suppose, his entirely admirable desire to show things as they actually were rather than how they might have been. Of course, being French, he dressed it up in fancy language. “Il n’y a rien dans ce monde qui n’ait un moment decisif” was how he put it.

Why do I bore you with this? Well, because yesterday afternoon when I was about to take a photograph of the struts being glued onto the soundboard, I caught myself on the verge of tidying the bench before the shot. Why on earth did I think that was necessary? I’m not trying to write an article for one of those wood-working magazines where, if the pictures are anything to go by, projects seem to reach completion without a tool being removed from a rack or a shaving falling to the floor.

Anyway, I stopped myself just in time. Here is where I’ve got to with the guitar that I’m working on at the moment.

The soundboard is nice piece (well, actually two pieces, of course) of close-grained spruce from Le Bois de Lutherie, which I joined and thicknessed to about 3mm – producing lots of shavings, as you can see below.

Then, using a Dremel mini-router in a shop-made device, I cut a channel for the rosette that I wrote about in a previous post, a few days ago.

Here’s the top, cut roughly to shape with the rosette inlaid.

A few years ago, the gardener at Corpus Christi College, Oxford gave me some laburnum wood from a tree that he had had to take down. I cut it up and air dried it, and use it sometimes in guitar making. By preparing a sector shaped billet and slicing off thin cross sections, it’s possible to fashion a rosette that shows the contrast between the light sapwood and dark heart wood. It’s a more conventional design than Rick Micheletti’s wacky and imaginative rosette that I discussed in my last post, but the effect is quite attractive when inlaid into a top of Alpine spruce. Below are pictures of the rosette and the piece of laburnum from which the individual slices were cut. Obviously, the top has yet to be joined and the rosette inlaid. Those are the next tasks.

And here is guitar that I made last year, which has a rather similar rosette:

%d bloggers like this: