Skip navigation

Tag Archives: guitar making

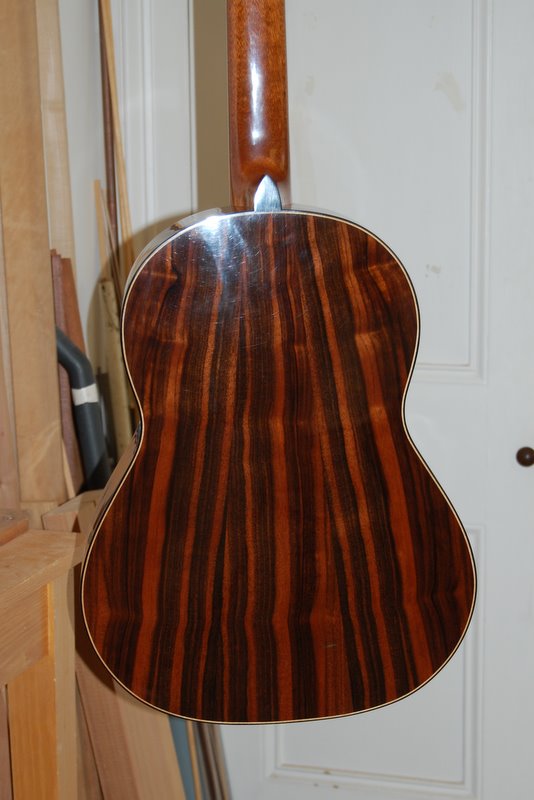
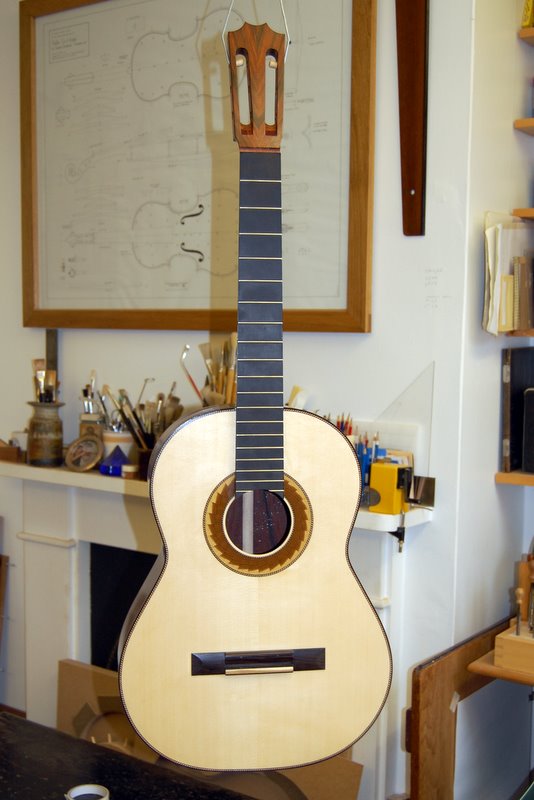
Following on from my recent experiment with a small guitar, I’ve been thinking about going a stage further and making a copy of a 19th century guitar of the sort for which Panormo is famous. There’s one in the Edinburgh University collection of historic musical instruments and, rather helpfully, there’s a measured drawing available. The collection’s website has fierce warnings about all the content being copyright so I haven’t posted a photograph, but you can see the instrument by clicking here.

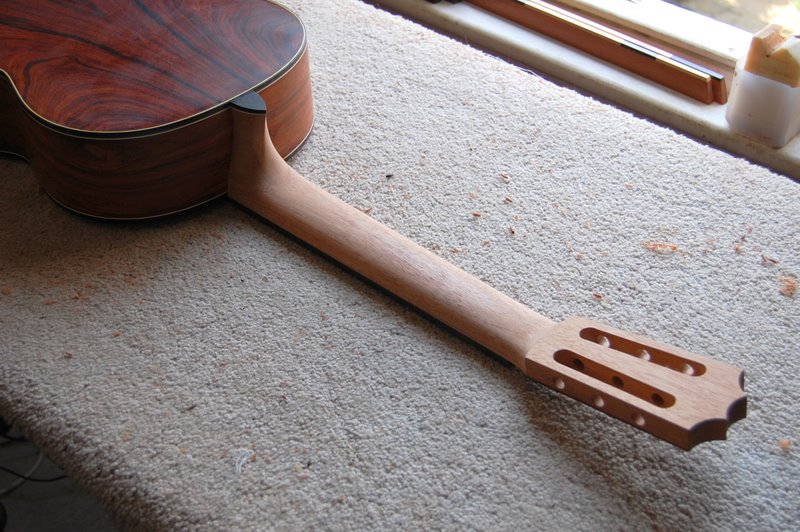
The neck of this guitar joins the head in a traditional V-joint. This isn’t a technique that I’ve ever used before so I’ve been trying it out, partly to get my hand in for making it and partly to reassure myself that the joint is stronger than it looks. There’s a good illustrated article on making V-joints on the Official Luthiers Forum, although you may have to register with the forum to get access. The geometry of the joint isn’t really very complicated but, on the other hand, it isn’t entirely straightforward either. The article explains it well.

The photograph below shows my rough first attempt being glued up. Hot hide glue is the correct stuff to use but, for this trial run, I substituted Titebond.

DSC_0001

Here it is with the clamps off.

DSC_0006

And after cleaning it up.

DSC_0008

And trying to break it.

DSC_0015

I wondered, in view of the endgrain gluing surfaces of the joint, whether the joint would be strong enough. So I played around, first by loading it with a 20kg weight and then by putting it in the vice and pulling on it as hard as I could. I couldn’t shift it and now feel entirely confident that it’s up to the job.

A few weeks ago, I mentioned that I had started making a classical guitar with slightly smaller dimensions than usual. I hadn’t got anything radical or particularly innovative in mind but I hoped that, by reducing the diameter of the lower bout, decreasing the depth of the ribs and using a scale length of 640mm, the instrument would be easier and more comfortable for a smaller person to play. The fingerboard and string spacing were also to be narrower by a few millimeters to suit someone with small hands, and the guitar was to be as light as reasonably possible.

The instrument is now finished. The top is cedar with lattice bracing. The ribs and back are of English walnut with an unusual ‘watermark’ figure and the rosette and headstock were made using spalted beech that Mark Bennett, who runs a funiture making business called the Woodlark, sold me a while ago. The fingerboard and bridge are of Rio rosewood and the tuning machines were made by Keith Robson. The final weight, with strings and tuning machines in place, was just over 1400 grammes, which is significantly lighter than the weight of most of my instruments.

It has only been strung up for a day or two and it has yet to be played by a proper guitarist but my first impressions of the sound are good and the volume doesn’t seem to be perceptibly less than that of larger instruments. I’ll try to add a recording sometime but, in the meantime, here are a few photographs of the completed guitar.

dsc_0018

dsc_0016

dsc_0020 dsc_0019 dsc_00231 dsc_0005 dsc_0011

It looks as if  I’m wrong about the problem with non-hardening shellac that I mentioned in my last post. There, I suggested that it might have been due to using mineral oil to stop the pad sticking when applying the shellac. Bob Flexner emailed me saying that neither he nor the hundreds of people that he has taught have ever encountered any trouble with mineral oil. Indeed, the reason that he prefers mineral oil to linseed oil is that unless one is careful in removing all the linseed oil, it cures soft and gummy on the surface.

I’d like to get to the bottom of the matter, not least because I don’t want to run into the same trouble in future. So I’ve carried out some experiments to try to reproduce the problem using various types of shellac in combination with various types of oil to see if they harden differently. If anything useful comes of them, I’ll write about it.

A few weeks ago, I started French polishing a cedar-topped guitar and, to avoid the temptation of rushing to get it finished, I began making another to give myself something to do while waiting for the polish to dry and harden. Absurdly, the strategy worked too well; I became so absorbed in making the second instrument that I didn’t pay enough attention to the one I was supposed to be polishing. This meant that I didn’t notice a problem: the shellac that I was putting on wasn’t hardening properly.

It took me a while both to identify the problem and to come up with a diagnosis. I’d been using light mineral oil on the pad (instead of the usual linseed oil) to stop any sticking as the polish was rubbed on and I reckon that some of this oil had got incorporated into the finish and slowed up the hardening. The advice to use mineral oil comes from the chapter on shellac in Bob Flexner’s book Understanding Wood Finishing, which is otherwise a mine of good sense. It’s possible of course, that I’m wrong in laying the blame at his door but when I eventually bit the bullet, wiped off the non-hardening shellac and started all over again using linseed oil, the problem didn’t recur. I’d be most interested to know if anyone else has had the same experience. Sometime I must make some experiments with different oils to find out whether this is the correct explanation.

All of this inevitably slowed down completion of both instruments and there hasn’t been much to photograph or write about, which is why there haven’t been any posts for the last couple of weeks. Anyway, I’m now at the final stages. Here’s the current state of the two guitars:

The fingerboard has now been fitted and fretted to a scale length of 650mm. I’ve more or less finalized the shape of the neck too. Time to make the bridge.

The binding and purfling went in quite neatly. It’s a simple scheme but I think it will look fine on the finished instrument. You can judge for yourself from the pictures. The apparent staining of the wood in some places is where I have brushed on some shellac to stop the white maple picking up dirt or, worse, turning an orange colour from contact with the cocobolo. It will disappear when the next coat of shellac goes on.

The next tasks are to prepare a fingerboard and make a bridge.

The binding is made from sawn veneers of ebony and maple. The photograph below shows a true edge being planed using a shooting board before using the bandsaw to slice off a narrow strip.

Here, a border of maple is being glued to the ebony in a shop-made clamping device.

Below is a strip of the finished binding, bent and ready to be glued into the ledge already routed on the guitar.

I’ve glued on the back, so the ‘box’ is closed and it’s looking pretty much like a guitar. The next task is the binding and purfling. The cocobolo of the back and ribs has a fine figure and I thought that the straightforward black and white (ebony and maple) scheme that I used for the last instrument would set it off nicely. As you can see , I’ve already made a start with the end block inlay.

The back has now had its three transverse braces fitted. It has been trimmed to shape and the linings of the ribs have been adjusted to receive it. So I’m all ready to close the box.

Well, this was the moment that I was trying to describe. First, the neck was glued to the soundboard. Then the tail block was positioned and glued, the ribs slid into place, and glued at the neck and the tail. Finally, the perimeter of the soundboard was attached with tentellones. Only a day’s work, but enough energy was added to the system (to continue my ridiculous metaphor from physics) to achieve a quantum leap.

Even if a guitar maker works away at a fairly steady rate, there are times when progress will be slow and times when the instrument makes a quantum leap. Cutting the soundhole in the top after inlaying the rosette always seems to me to be a quantum leap moment. Another, as I’ve mentioned before, is when you start to assemble the collection of oddly shaped pieces of wood into something that is recognizably a guitar. I’m looking forward to that moment later today. For now, it’s still a pile of oddly shaped pieces of wood:

I’ve been thinking about the rosette for this guitar. The traditional rosette on a classical guitar is a repeating mosaic pattern made up of thin strips of differently coloured woods often less than a millimetre square in size. It’s an elaborate and painstaking business to make and, though it’s heresy to say so, I’ve never thought that the results were  very exciting. The pattern is just too fine to be appreciated, or even noticed, more than a couple of feet away. Besides, it’s too contrived, too finicky, too far removed from any function.

Trying to find a simpler and visually bolder solution I’ve been experimenting with inlays of saw cut veneer and you can see the results below. The rosette on the left is made out of laburnum by slicing a sector-shaped log containing both sapwood and heartwood across the grain, and arranging the slices in order around the sound hole. The one in the middle is made in the same way but using yew rather than laburnum – another wood with a striking contrast between sapwood and heartwood. On the right, the rosette is made of spalted crab-apple but orientated to display long grain, not end grain.

dsc_0060.jpg dsc_0008.jpg l1020756-1.jpg

Click on thumbnails for an enlarged view.

I’m inclining towards using spalted crab-apple for the rosette of this guitar too. The creamy colour should make a striking contrast with the sandy colour of the cedar top that I intend to use. In a previous guitar, I carried the theme a bit further by using spalted crab-apple veneer for the headstock – an idea which might work with this guitar too.

l1020758.jpg