Skip navigation

Well, this was the moment that I was trying to describe. First, the neck was glued to the soundboard. Then the tail block was positioned and glued, the ribs slid into place, and glued at the neck and the tail. Finally, the perimeter of the soundboard was attached with tentellones. Only a day’s work, but enough energy was added to the system (to continue my ridiculous metaphor from physics) to achieve a quantum leap.

Even if a guitar maker works away at a fairly steady rate, there are times when progress will be slow and times when the instrument makes a quantum leap. Cutting the soundhole in the top after inlaying the rosette always seems to me to be a quantum leap moment. Another, as I’ve mentioned before, is when you start to assemble the collection of oddly shaped pieces of wood into something that is recognizably a guitar. I’m looking forward to that moment later today. For now, it’s still a pile of oddly shaped pieces of wood:

Here’s the soundboard with all the bracing glued into place. As you can see, I’ve used a conventional arrangement with 7 struts symmetrically arranged in the familiar fan system and 2 closing bars at their lower ends. Over the years, guitar makers have experimented with the geometry of the bracing pattern with asymmetries, wide squat bars, tall narrow bars, transverse bars under the bridge, openings in the transverse bar under the soundhole and endless other variations. Part of the reason, I suspect, is that it’s so easy to do. No new jigs or moulds to make; no new skills to learn. And it’s something to talk to clients about – a unique selling point. Maybe that is too cynical but I tend to agree with William Cumpiano and Jonathan Natelson who wrote in their classic Guitarmaking: Tradition and Technology that ‘…specific elements of brace design, in and of themselves, are not all that important’. I need to admit that I have used a lattice bracing system with cedar soundboards (as I did with the last guitar that I made, which is being finished at the moment). It works perfectly well but I’m not yet convinced that it’s a significant improvement. Anyway, whatever the pro’s and con’s of these different systems, the new guitar is entirely traditional in its bracing.

The great photographer, Henri Cartier-Bresson, is said never to have re-arranged a scene or cropped a negative. It was, I suppose, his entirely admirable desire to show things as they actually were rather than how they might have been. Of course, being French, he dressed it up in fancy language. “Il n’y a rien dans ce monde qui n’ait un moment decisif” was how he put it.

Why do I bore you with this? Well, because yesterday afternoon when I was about to take a photograph of the struts being glued onto the soundboard, I caught myself on the verge of tidying the bench before the shot. Why on earth did I think that was necessary? I’m not trying to write an article for one of those wood-working magazines where, if the pictures are anything to go by, projects seem to reach completion without a tool being removed from a rack or a shaving falling to the floor.

Anyway, I stopped myself just in time. Here is where I’ve got to with the guitar that I’m working on at the moment.

The soundboard is nice piece (well, actually two pieces, of course) of close-grained spruce from Le Bois de Lutherie, which I joined and thicknessed to about 3mm – producing lots of shavings, as you can see below.

Then, using a Dremel mini-router in a shop-made device, I cut a channel for the rosette that I wrote about in a previous post, a few days ago.

Here’s the top, cut roughly to shape with the rosette inlaid.

A few years ago, the gardener at Corpus Christi College, Oxford gave me some laburnum wood from a tree that he had had to take down. I cut it up and air dried it, and use it sometimes in guitar making. By preparing a sector shaped billet and slicing off thin cross sections, it’s possible to fashion a rosette that shows the contrast between the light sapwood and dark heart wood. It’s a more conventional design than Rick Micheletti’s wacky and imaginative rosette that I discussed in my last post, but the effect is quite attractive when inlaid into a top of Alpine spruce. Below are pictures of the rosette and the piece of laburnum from which the individual slices were cut. Obviously, the top has yet to be joined and the rosette inlaid. Those are the next tasks.

And here is guitar that I made last year, which has a rather similar rosette:

A new guitar means a new decision about what rosette it should have. I’ve written about my views on rosettes before, so I’ll just say that my preference is for designs that are bold and simple over those that tend towards the ornate and finicky. This instrument is going to have a top of European spruce, which is very pale, and the spalted apple wood that I used for the red cedar top of the last guitar won’t provide enough of a colour contrast.

Rick Micheletti, a guitar maker in Mendocino, California, has invented a strikingly attractive and imaginative design for the rosettes that he inlays into the tops of his steel string guitars, as you can see from the pictures below:

MIcheletti rosette

What’s more, he provides a step-by-step guide how to do it. I shan’t copy his design, but his generosity in sharing his technique has stimulated me to start thinking outside the concentric circles of conventional rosettes.

After thicknessing and cutting out the back, there was enough wood left to make a bookmatched headstock veneer. It’s quite a nice idea, I think, for the headstock veneer to be the same wood as the back and ribs, although, of course, there are many other attractive possibilities. Here are a couple of photographs taken after the veneer has been glued, the headstock cut out, shaped and drilled, and the tuning machines temporarily put in place to make sure they fit properly.

.

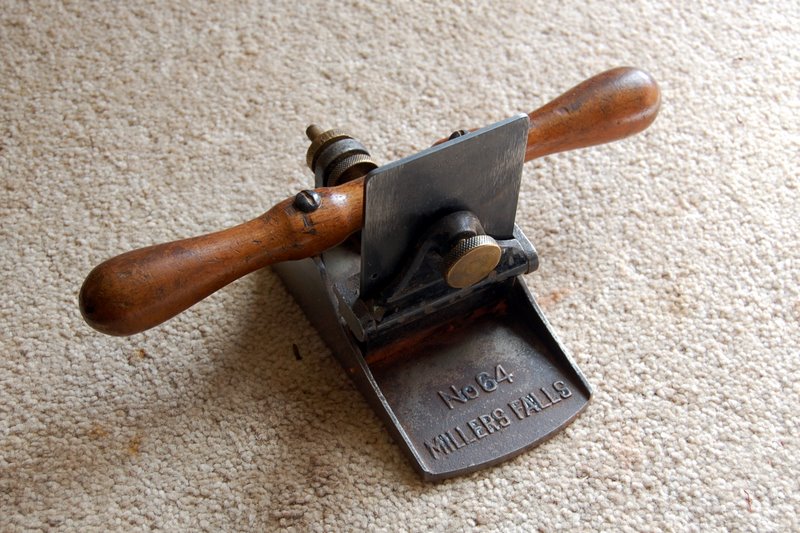
The cocobolo guitar back that I showed in an earlier post is now jointed and I spent some time yesterday bringing it down to a thickness of just over 2 mm. The grain of the two halves runs in opposite directions after ‘book-matching’, which makes it difficult to avoid tearout along the centre join. And even without that, cocobolo is hard and difficult to deal with. The tool that solves these problems is my Millers Falls scraper plane.

I bought it several years ago in a second hand tool shop and never found it worked well enough to be useful until I replaced its thin cabinet scraper blade with a thicker one from Ron Hock. This transformed its performance and, although I suppose you could do the job with a cabinet scraper by hand, I now think of it as an indispensable tool.

Since it works with a negative cutting angle, a scraper plane doesn’t remove much material at a time. So, if you’re starting with wood that is way too thick, you need something that’s faster, even if it leaves a rougher finish, to get down to somewhere near the final thickness before switching to the scraper plane. A good tool for that is a smoothing plane fitted with a modified (toothed) blade but I’ll save that discussion for another post. Pictures of the scraper plane below.

An exciting evening yesterday. The guitar had its first outing when it was played by my talented friend, Hazel. She tried it out with several pieces, including one by Leo Brouwer, A day in November, which might sound an odd title, given that it’s quite a sunny composition, until you remember that Brouwer is Cuban and that November in Cuba isn’t the dismal month that it is in England.

Of course, if I’m honest, I have to admit that I was more interested in how the guitar sounded than in the music she played. And she made it sound wonderful. I was right that it was a loud instrument but it’s warm and balanced too and I think it’s going to turn out well.

I’m french polishing the guitar at the moment and this is not a process to be hurried. It’s important to let the polish have time to harden. If you don’t, and try to finish the front before the back is properly hard, it’s easy to spoil what you’ve already done. So to avoid the temptation to go too quickly, I’ve started to prepare for the next instrument. The person I’m making it for chose a nicely figured set of cocobolo, which I’ve just cleaned up to remove the sawmarks, and I’m thinking about the best way to bookmatch it. Here are the possibilities (click on the thumbnails to enlarge):

There’s a tiny flash of light coloured sap wood visible in the first and last and, if I chose either of these combinations, I’d have to make the additional decision of whether to leave it in or cut it out.

The combined tension of the strings of a classical guitar adds up to around 40 kilograms, so although it’s an exciting moment, I always feel just a smidgen of anxiety as I bring an instrument up to pitch for the first time. But I’m glad to say that nothing split, cracked or came unglued.

It’s too early to make a judgement on how it sounds – the action is still a little high, and it has yet to receive the final coats of varnish. Besides, instruments change, invariably for the better, in the first weeks and months of their life. Even so, I’m pleased: it’s going to be a powerful beast, I think. The bass is warm and resonant and the trebles already sing clearly but, as I say, we’ll have to wait a bit before forming a definite opinion about its musical qualities.

Here are a couple of photographs, taken as the low spring sunlight streamed into my workshop yesterday afternoon.

Here are some pictures of the last stages of building this guitar.

The one immediately below shows the binding scheme that I settled on – ebony with a narrow band of maple.

Here’s the upper part of the top showing the gently radiused fingerboard and the purfling, the decorative border immediately inside the binding.

I’ve shaped the neck and heel and added an ebony heelcap, again with a thin lining of maple.

And here is the bridge being clamped while the glue sets. I’ll leave it undisturbed overnight and string it up tomorrow.

One question to be resolved is what wood to use for the bindings of this guitar – the strips around the edges of the soundboard and back that frame the instrument visually and protect the vulnerable corners. As I mentioned when I talked about rosettes a few weeks ago, I prefer bold and straightforward (as opposed to fine and detailed) when it comes to how a guitar looks. For this instrument either the strong black of ebony or the light creamy colour of holly seemed possibilities (see pictures below) .

ebony.jpg dsc_0002.jpg

I couldn’t make up my mind which would look better and only reached a decision by asking the person whom I was making it for. He had no doubt that he preferred the ebony. Pictures of the guitar with the binding and purfling in place to follow.

I regret that there were so few posts last month. Blame a skiing holiday and a cluster of deadlines in activities other than instrument making. However, the guitar is nearing completion and I’ll post further photographs soon. In the meantime, you may like to have a look at the instruments shown in the new Gallery page.