Skip navigation

Category Archives: guitars

A few weeks ago, I bought a block of spalted beech from Mark Bennett and mentioned, in a previous post, that I hoped it would make some striking guitar rosettes. I’ve been trying out some ideas. Here’s the piece of wood that provided the starting point.

DSC_0001

Having decided which face looked most attractive, I set up the bandsaw for a fine cut and sawed two veneers at about 4mm thickness. Then I book-matched them to create a more or less symmetrical pattern, by gluing them onto thin (1/64 inch) plywood for stability. Actually, there’s a bit more to it than that. First, using weak hot hide glue, I stuck a sheet of paper to a 6 by 6 inch square of 6mm MDF. Then I stuck a similar sized square of 1/64 inch thick plywood over that, again using thin hide glue, and weighted it down until the glue was dry. This provided the base onto which the veneers were glued.

DSC_0004

Using a Dremel mounted in a jig (details of jig available here) I cut out the rosette making the depth of cut just through the layer of thin plywood. It was then possible to remove the rosette using a thin blade – an ordinary knife from the dinner table works well – sliding it between the plywood and MDF layers in the plane of cleavage provided by the paper. Any paper or glue remaining on the underside of the rosette can easily be cleaned off with a hot damp cloth, which of course was the reason for using hide glue in the first place.

DSC_0007

I missed the opportunity to photograph either the detached rosette or the routed channel in the soundboard but below you can see the rosette being glued into position on the soundboard, weighted down so that it dries flat.

DSC_0010

Looking around for more on V-joints, I found Gary Demos’ site where he describes not only the construction of the joint but how he made a copy of a Panormo guitar. It’s a fine looking instrument and there are a few mp3 files that show that it sounds very good as well.

Cumpiano’s website has a brief discussion of the merits of the V-joint versus the scarf joint too. (You’ll need to scroll down a bit to find it.) I enjoyed his comment:

If you use a v-joint people will shower you with praises for your skill and those in the know will guess that you don’t have to make a living at making guitars.

There’s probably some truth in that. I’ve always admired Cumpiano’s down to earth approach to guitar making and his refusal to subscribe to anything that can’t be properly explained. See, for example, his courteous but uncompromising dismissal of the mystique of tap tone tuning.

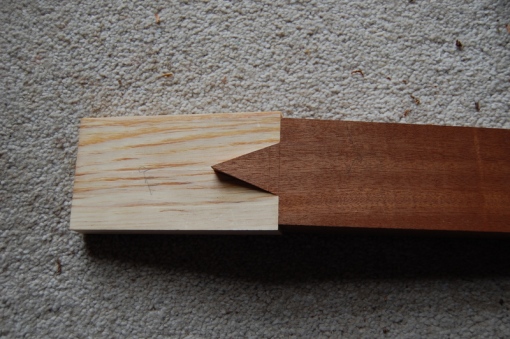
Still, in the interests of historical accuracy, I’m going to pursue the V-joint a bit further. It seemed worth shaping the neck and headstock of my trial joint to get an idea of what it would look like on a finished instrument. In reality, it doesn’t look quite as good as the photographs suggest. At this resolution, glue lines, which in places are wider than they should be, don’t show up. But I’ve discovered two useful things: first, that the joint isn’t impossibly difficult to make and second, that it’s certainly strong enough.

DSC_0003

DSC_0004

Following on from my recent experiment with a small guitar, I’ve been thinking about going a stage further and making a copy of a 19th century guitar of the sort for which Panormo is famous. There’s one in the Edinburgh University collection of historic musical instruments and, rather helpfully, there’s a measured drawing available. The collection’s website has fierce warnings about all the content being copyright so I haven’t posted a photograph, but you can see the instrument by clicking here.

The neck of this guitar joins the head in a traditional V-joint. This isn’t a technique that I’ve ever used before so I’ve been trying it out, partly to get my hand in for making it and partly to reassure myself that the joint is stronger than it looks. There’s a good illustrated article on making V-joints on the Official Luthiers Forum, although you may have to register with the forum to get access. The geometry of the joint isn’t really very complicated but, on the other hand, it isn’t entirely straightforward either. The article explains it well.

The photograph below shows my rough first attempt being glued up. Hot hide glue is the correct stuff to use but, for this trial run, I substituted Titebond.

DSC_0001

Here it is with the clamps off.

DSC_0006

And after cleaning it up.

DSC_0008

And trying to break it.

DSC_0015

I wondered, in view of the endgrain gluing surfaces of the joint, whether the joint would be strong enough. So I played around, first by loading it with a 20kg weight and then by putting it in the vice and pulling on it as hard as I could. I couldn’t shift it and now feel entirely confident that it’s up to the job.

Classic Hand Tools held a show at West Dean last weekend. It wasn’t a big event but I’m glad that I went for all sorts of reasons. One was the opportunity to meet Karl Holtey and to see and handle some of the planes that he makes. Another was to talk to Mark Bennett who, as always, had brought some amazing wood with him. With some difficulty, I succeeded in persuading him to part with this remarkable specimen of spalted beech.

DSC_0001

It’s not a big block (only about 5 inches by 5 inches by 6 inches) but the figure is exactly the right scale for instrument making. My first thought was  that it would make striking rosettes for guitars and I’ve been playing around with designs (using photocopies so as not to waste any of the material). Here’s one idea:

DSC_0007

A few weeks ago, I mentioned that I had started making a classical guitar with slightly smaller dimensions than usual. I hadn’t got anything radical or particularly innovative in mind but I hoped that, by reducing the diameter of the lower bout, decreasing the depth of the ribs and using a scale length of 640mm, the instrument would be easier and more comfortable for a smaller person to play. The fingerboard and string spacing were also to be narrower by a few millimeters to suit someone with small hands, and the guitar was to be as light as reasonably possible.

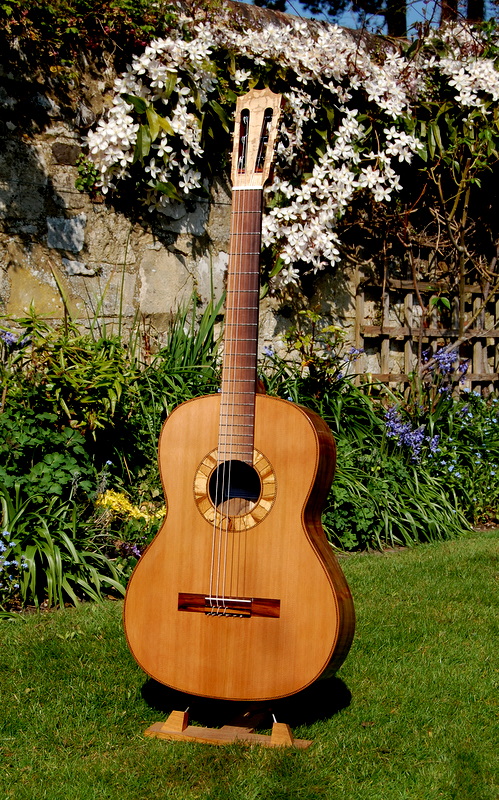
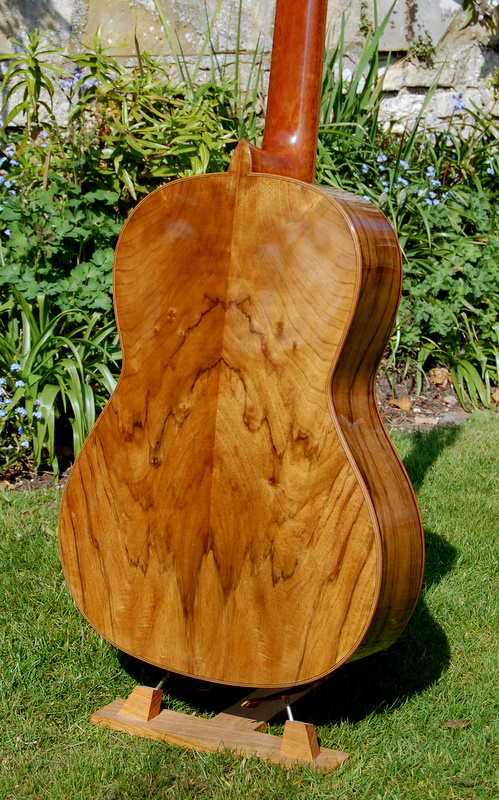
The instrument is now finished. The top is cedar with lattice bracing. The ribs and back are of English walnut with an unusual ‘watermark’ figure and the rosette and headstock were made using spalted beech that Mark Bennett, who runs a funiture making business called the Woodlark, sold me a while ago. The fingerboard and bridge are of Rio rosewood and the tuning machines were made by Keith Robson. The final weight, with strings and tuning machines in place, was just over 1400 grammes, which is significantly lighter than the weight of most of my instruments.

It has only been strung up for a day or two and it has yet to be played by a proper guitarist but my first impressions of the sound are good and the volume doesn’t seem to be perceptibly less than that of larger instruments. I’ll try to add a recording sometime but, in the meantime, here are a few photographs of the completed guitar.

dsc_0018

dsc_0016

dsc_0020 dsc_0019 dsc_00231 dsc_0005 dsc_0011

A report from the UK last year complained that gender stereotyping influenced children’s choices about which musical instruments they took up. Girls get to play harps and flutes, while boys prefer trumpets and drums. I don’t know whether this is really right or that, even if it were, it would be a very terrible thing, but it certainly is true that more boys than girls play guitars. And while this might be gender politics, I can’t help wondering if the dimensions of the guitar have something to do with it too. The body of a concert guitar can be too big for many women to hold comfortably and I suspect that the usual measurements for the string spacing and fingerboard size are optimised for a male rather than a female hand.

I thought that it might be interesting to make a guitar with a slightly smaller body size than usual and combine it with a shorter scale length and narrower fingerboard. The idea is to make an instrument that a woman will find easy and responsive to play without compromising either the quality or the volume of the sound it produces.

The water-mark figure in this walnut is attractive but delicate and I think that it might work well for the back of a smaller guitar:

dsc_0003 dsc_0004

The front will be cedar and I’ve inlaid a rosette of spalted beech. I’ve carried the same theme through to the headstock veneer.

dsc_0001dsc_00081