Skip navigation

Tag Archives: chisel

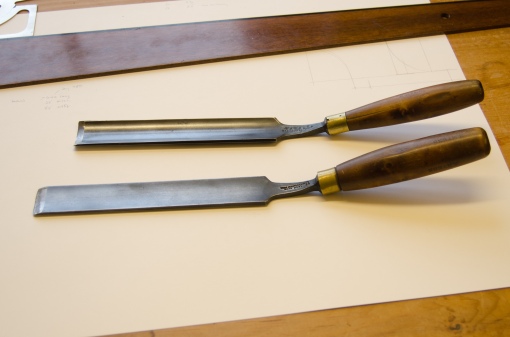
Pattern makers often used long gouges and chisels with a crank between the blade and the handle. This allowed them to operate the tool deep into a workpiece without the handle catching on the edge. In his Dictionary of Tools, R. A. Salaman calls them trowel-shanked, but one often hears them referred to as cranked or crank-handled too.


trowel shank gouge


I’ve got a couple of long in-cannel gouges which I suspect were originally straight and later modified to achieve the same end. Perhaps R. Myers (the name stamped on the handle of the gouge) needed a tool with a cranked shank in a hurry, didn’t have time to obtain one, and so decided to make the best of what he had. The steel at the bent part of the shank is dark and discoloured, which supports the idea because it would surely have been necessary to heat the shank to bend it successfully.

DSC_6959

DSC_6960

Mr Myer’s talent for improvisation and economy prompted me to try something similar with a small chisel blade. I’d often thought that a small crank-handled chisel would be the perfect tool for cleaning up squeezed out glue when putting braces and harmonic bars on guitar soundboards but the only ones that I had come across were too big for what I had in mind, and too expensive as well.

I removed the handle from the chisel, wrapped the blade in a wet rag to prevent the important part of the tool losing its temper and then, after heating the shank to red heat with a propane torch, bent it up about 15°.

When it had cooled, I put the handle back on and was delighted to find that it worked just about as well as I hoped it would. The flat underside of the blade acts as a jig and prevents it digging in, and the raised handle allows it to be used in places where accessibility is restricted.

DSC_6966

DSC_6964

A comment on the previous post asked about setting the honing angle.

Here’s one way of doing it. Set a sliding bevel to the angle you’re after. (I chose 30°.) Then, after fitting the chisel into the mould, adjust the position of the mould in the honing jig, by eye, so that the longitudinal axis of the chisel runs parallel with the blade of the sliding bevel.


I glued a strip of wood across the underside of the mould so that it can be located in the honing jig at the same angle every time. And that’s it.


Eventually, I suppose, repeated honing will shorten the chisel and increase the angle of the secondary bevel. That will mean that it’s time to regrind the primary bevel and repeat this process to restore the angle of the secondary bevel.

A point I forgot to mention in the earlier post is that it’s worth creating a stop in the moulding at its upper end to prevent any tendency for the chisel to slide up while it’s being honed. Here you can see a stop formed by the lip that mirrors the indentation between the socket and the handle of the chisel.


A pair of chisels reground with left and right skewed edges is almost essential for cleaning out the sockets of lap dovetails. These chisels are useful for other tasks as well – tidying up the inside of the pegbox of a violin or cello, for example. I’ve got several pairs in different sizes and, although I don’t use them everyday, there are jobs where no other tool will do.

Actually, that isn’t quite true. A fishtail chisel makes a good substitute and, because it can work into both left and right pointing corners, you only need one tool rather than a pair. Last Summer, visiting Mark Bennett in his workshop in Yorkshire (see below) I saw him using one made by Lie-Nielsen. It was such an attractive looking tool that, even though I didn’t really need it, I couldn’t resist buying one to try.

After it arrived, I honed it, maintaining the 25° angle of the original grind. Perhaps it was my lack of skill – keeping such a small bevel flat on the stone wasn’t easy – but I never managed to get it properly sharp. What’s more, the edge that I did achieve didn’t stand up to use on hardwoods.

Of course, there’s an obvious solution to both these problems: create a secondary bevel at a slightly steeper angle. Indeed, Lie-Nielsen recommend exactly that in the leaflet that comes with the chisel.

However, I was reluctant to do this freehand because, although I was sure that it would work well enough the first few times, I knew that in the long run I’d be unable to maintain the same angle. This would mean that I’d end up with a rounded secondary bevel that would require more and more honing with each sharpening to get a decent edge. And, quite apart from the extra time this would take, it’s a bad idea to hone or grind a fishtail more than absolutely necessary. There isn’t much metal there in the first place and with each grinding the cutting edge gets progressive narrower. 

A honing jig would have solved the problem, except for the fact that I couldn’t make  the conical shape of the shaft of the tool  fit securely into any of the jigs in my workshop.

In the end, I got around this difficulty by casting a mould out of the sort of two-part wood filler that sets hard in about 30 minutes. I’ve written about this technique for holding awkwardly shaped object before (scroll down in the Tools and Jigs section of the website) so I won’t go into it in detail here. But briefly, you mix a generous quantity of the filler, spread it on a board (in this case a thin piece of wood of a size that would fit into an Eclipse honing jig), cover with a layer of cling film, and press the object you want to mould into it, holding it place with a weight or a clamp until the filler sets. Then, of course, you can take it out and get rid of the cling film.

I’m hoping that the photographs below will the idea clear:

And it worked – at least for one of the objectives. The edge on the chisel was keen enough to slice soft paper towel and to pare endgrain.

Whether it will achieve the second objective of minimising attrition of the blade with repeated sharpenings is another matter. Time will tell.